


Are you working as a project manager? Is your company using Planisware Orchestra for scheduling? Do you have only little basic knowledge of how to create a project plan in Planisware Orchestra? Then this Planisware Orchestra tutorial will give you a jump-start. In 11 simple steps, you will learn the most important basics to create your project plan in Planisware Orchestra.
- Step 1: Define your project type first
- Step 2: Define the work packages as summary tasks
- Step 3: Define predecessors and successors for the summary tasks
- Step 4: Detail each work package by adding activities
- Step 5: Decide which activities are task and which are milestones
- Step 6: Estimate duration for tasks and enter it on task level
- Step 7: Define predecessors and successors for activities
- Step 8: Define a stage-and-gate structure for your project
- Step 9: Decide which summary tasks are stages and which milestones are gates
- Step 10: Define gatekeepers for gates
- Step 11: Save a baseline
- Conclusion – Planisware Orchestra Tutorial
Planisware Orchestra is a turnkey project portfolio management solution for small and medium-sized enterprises. Planisware Orchestra combines all tools to plan, implement and track project portfolios in one single tool. Apart from access to comprehensive functions for end-to-end project portfolio management, the cloud platform also provides many options for collaboration to all project participants.
Let us start with step 1.
Interested in Planisware Enterprise rather than Planisware Orchestra?
Please, read our corresponding Planisware Enterprise Tutorial.Speaking of PM tools, we also have an MS Project Tutorial on this blog.
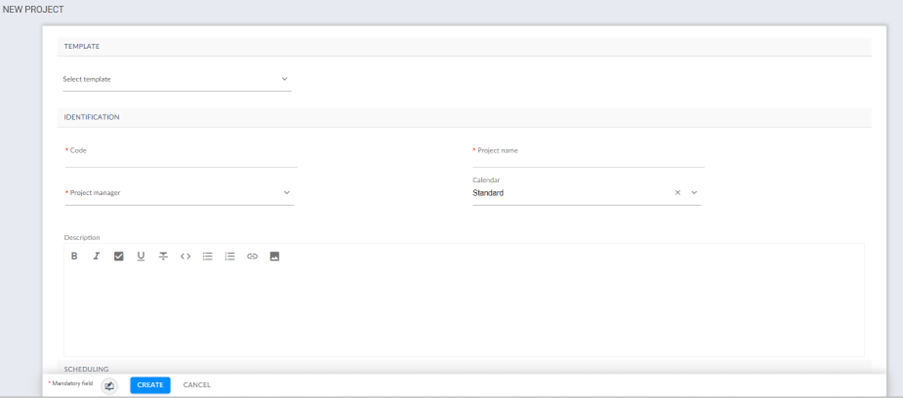
Step 1: Define Your Project Type First
When initiating a project in Planisware Orchestra, it is essential to determine the project type, specifically whether you will utilize a predefined template or construct a project plan from the ground up.
Planisware Orchestra offers a variety of pre-configured project templates designed to align with industry best practices. These templates come with predefined tasks, milestones, and structures, serving as a solid starting point for your project.
For a product development project in Planisware Orchestra, you might opt for a template that includes stages like concept, design, development, testing, and launch. This ensures that your project follows established procedures and workflows.
If your project requires a unique structure or does not align with existing templates, you can choose to build a project plan from scratch in Planisware Orchestra. This approach provides maximum flexibility but necessitates meticulous consideration of each project element.
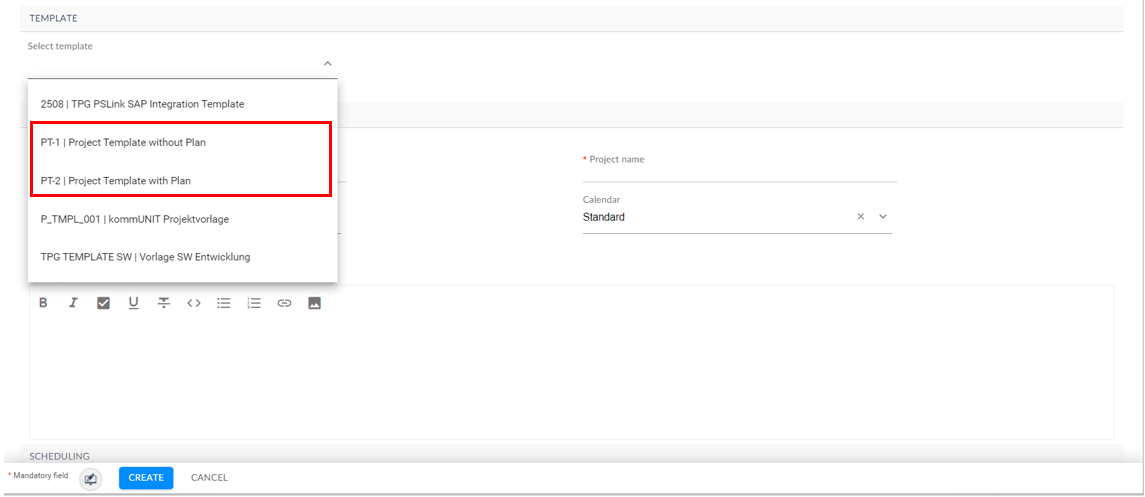
In either scenario, it is crucial to establish project templates, whether they include a predefined project plan or not, prior to your attempt to initiate a new project.
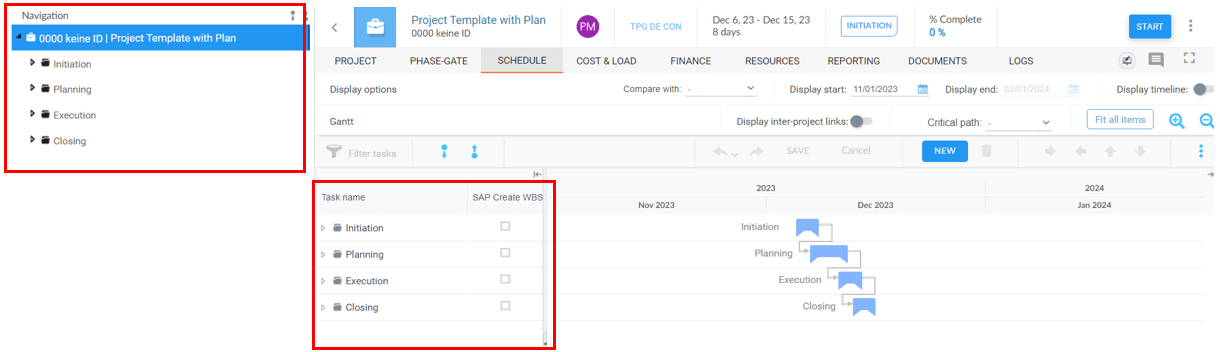
Step 2: Define the Work Packages as Summary Tasks
In the context of Planisware Orchestra, it is essential that you designate work packages as summary tasks when creating project templates. This ensures a structured and organized representation of project components.
For instance, when you are setting up a template for a software development project, you should define phases such as “Requirements”, “Design”, “Development”, and “Testing” as summary tasks to encapsulate related work packages within each phase. This approach enhances clarity and facilitates efficient project management within Planisware Orchestra.

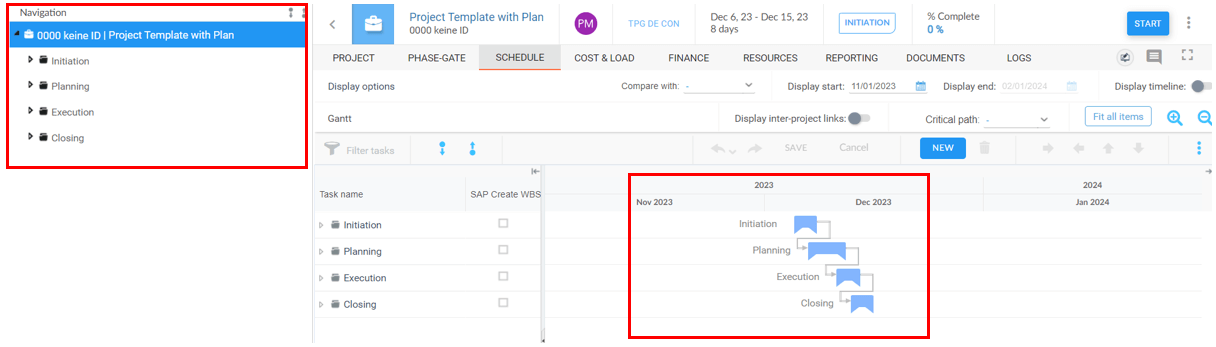
Step 3: Define Predecessors and Successors for the Summary Tasks
When you are working in Planisware Orchestra, it is imperative to establish predecessors and successors for summary tasks to construct a high-level Work Breakdown Structure (WBS).
Identify the logical dependencies between different phases or summary tasks in your project. Establishing predecessors and successors helps you outline the sequence in which these tasks should be executed. In a product development project, you might establish that the “Design” phase is a predecessor to the “Development” phase, as the design must be completed before development can begin. Conversely, the “Testing” phase might be a successor to “Development”.
Use the defined predecessors and successors to organize summary tasks into a high-level Work Breakdown Structure. This structure provides a visual representation of the project’s hierarchy and helps in understanding the relationships between different components. Your high-level WBS might include top-level summary tasks such as “Project Initiation”, “Development”, and “Testing”.
Under “Development” you can further break down tasks into more detailed work packages like “Coding” and “Unit Testing”.
Step 4: Detail Each Work Package by Adding Activities
To access work packages in Planisware Orchestra, log in to the platform and navigate to the relevant project in which you intend to provide detailed information on work packages.
Once in the system, open the Work Package module, which is the designated area for managing and monitoring intricate project tasks.
Within this module, select the specific work package of interest by clicking on it.
Ensure you specify detailed information for each activity, including the activity name, start date, end date, estimated duration.
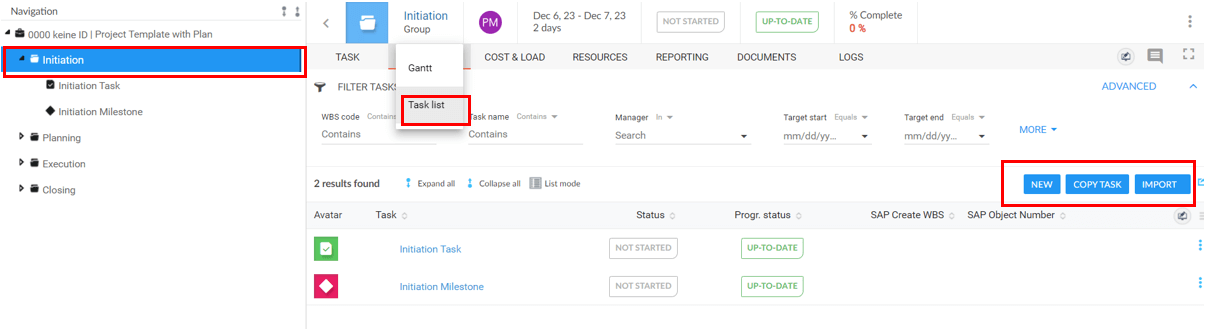
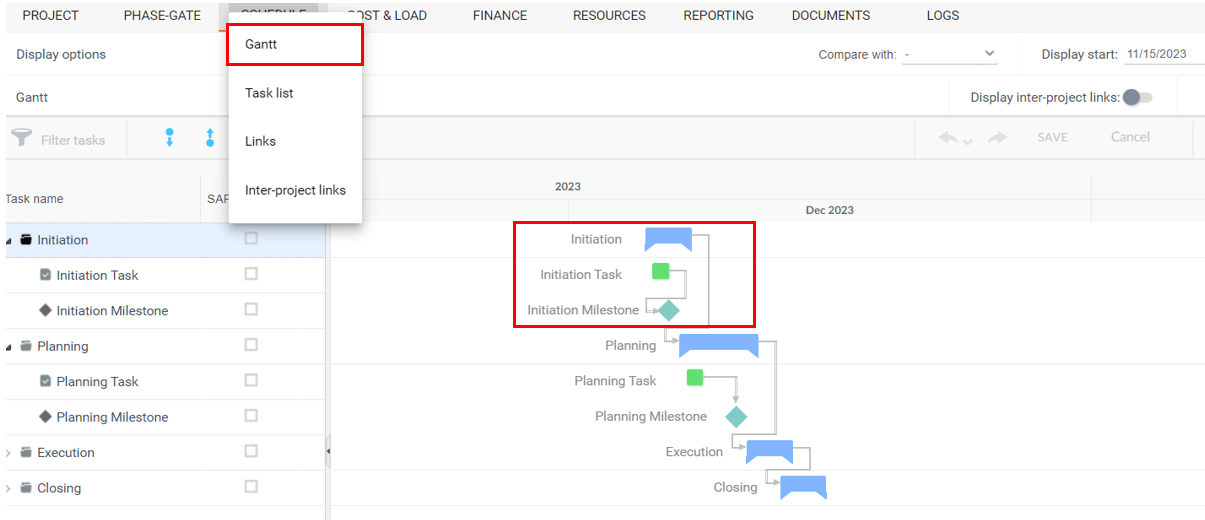
Option 1: Use Gantt Chart to Add Activities as Subtasks
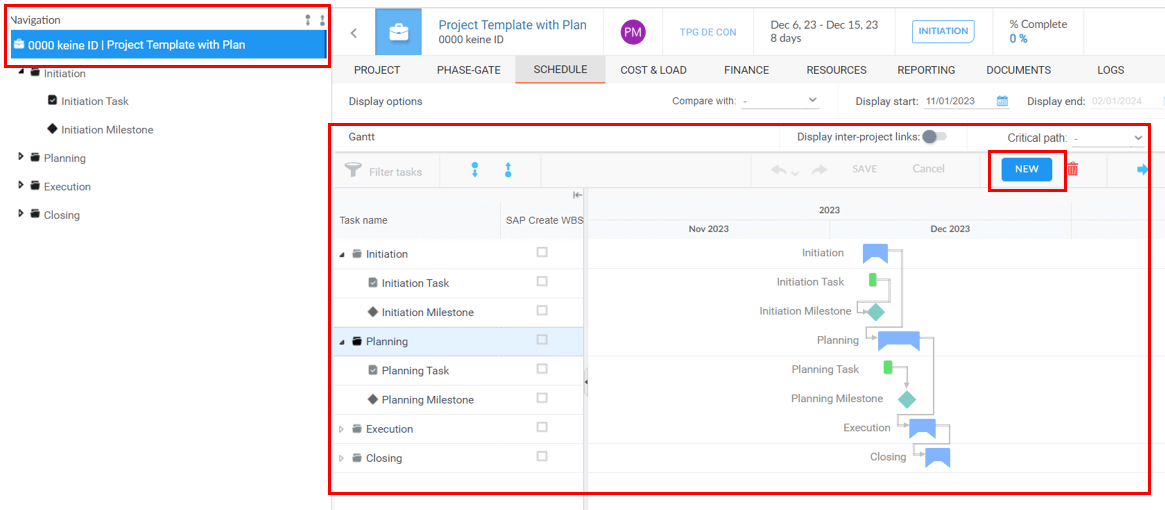
Option 2: Select Each Work Package and Add Activities from Task List
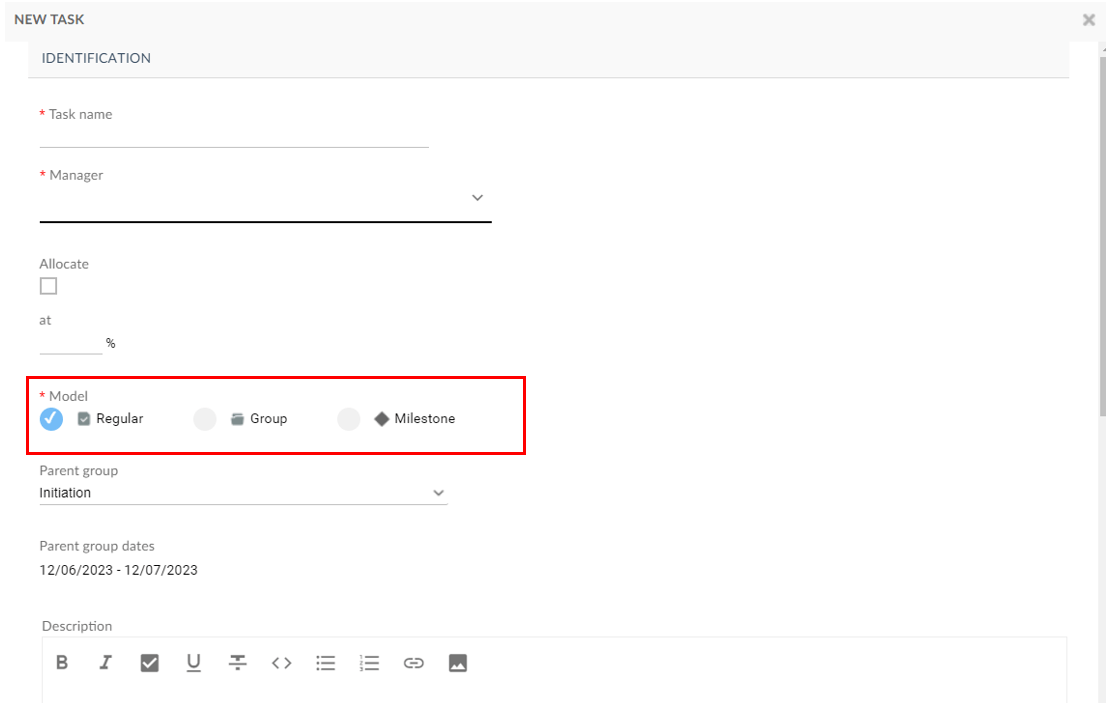
Step 5: Decide Which Activities Are Tasks and Which Are Milestones
When creating a new task, you have to decide whether it should be a regular task or a milestone. Select your choice in Planisware Orchestra by checking the matching box.
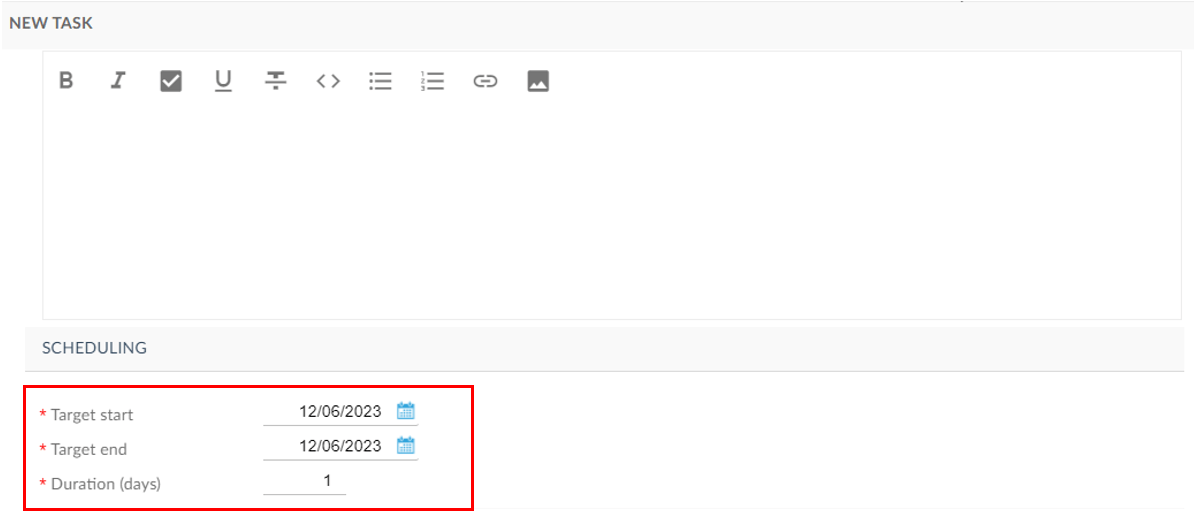
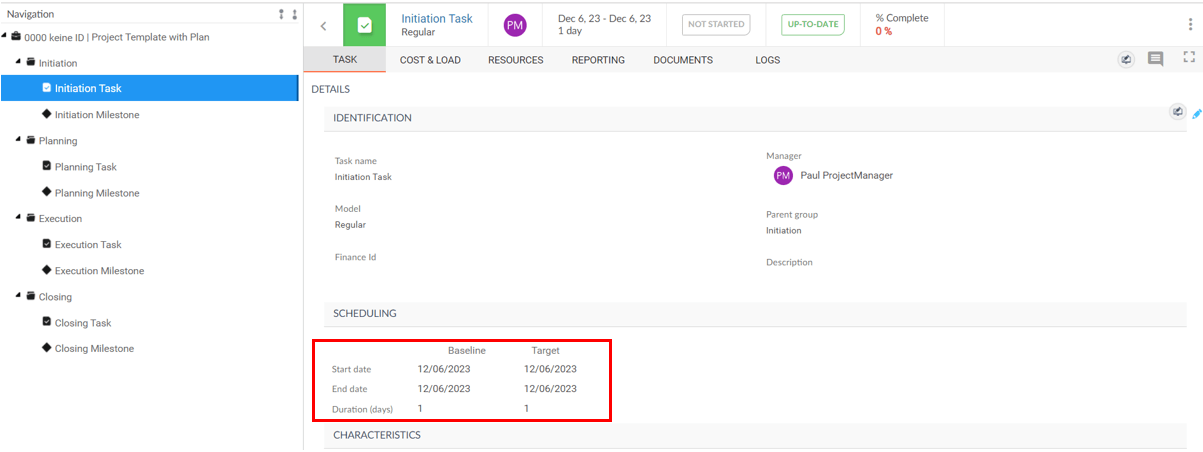
Step 6: Estimate Duration for Tasks and Enter It at Task Level
In Planisware Orchestra, navigate to the task details section, then to “Scheduling” and enter the estimated target duration and Start Date. For a new task, the process can be completed in a single step.
Step 7: Define Predecessors and Successors for Activities
Commence the connection process by linking Summary Tasks from the highest WBS level initially, and then extend the same logic to the subtask level. By finishing the WBS, avoid connecting tasks across different WBS hierarchy levels.
Ensure that the Milestone serving as the gate in a stage-and-gate structure is positioned as the final task within the summary task.
Step 8: Define a Stage-and-Gate Structure for Your Project
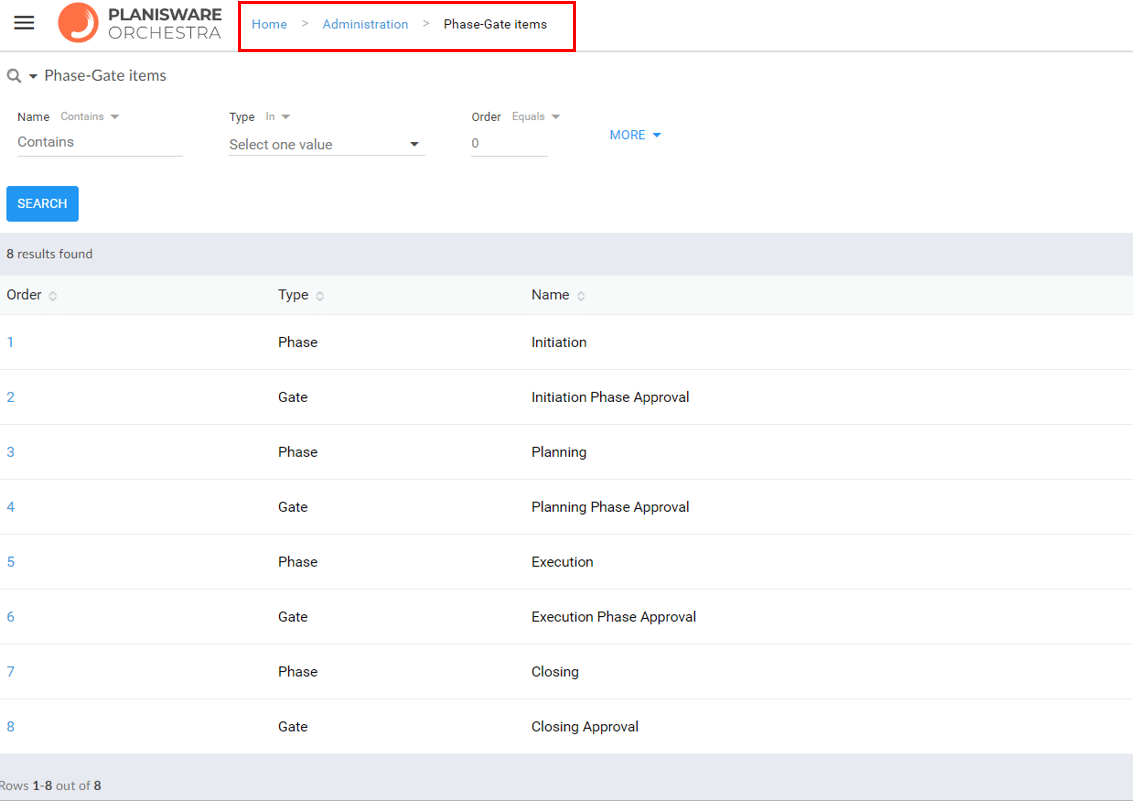
Begin by confirming that the “Phase-Gate” option is enabled in the project properties.

In the absence of admin rights, a user with administrative privileges to create phases and stages must establish the phases and stages, which can subsequently be chosen for incorporation into your summary tasks and milestones.
Step 9: Decide Which Summary Tasks are Stages and Which Milestones Are Gates
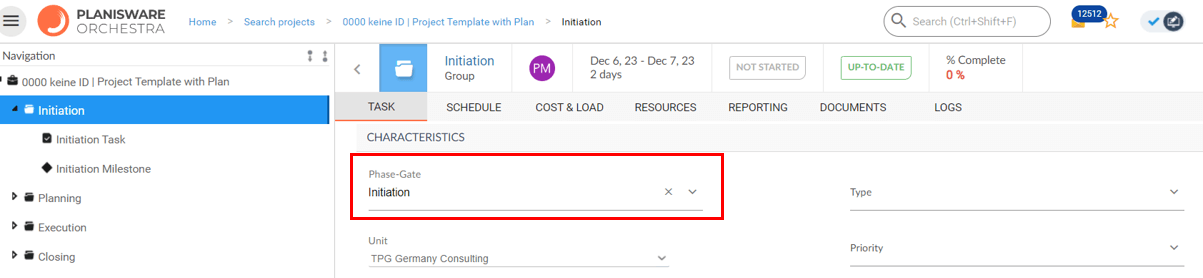
Access the task list, click on the desired summary tasks to designate them as phases. Proceed to the “Details” section and specify the summary task as a stage (Phase). It is important to note that a phase can be used only once in your project; thus, you can repeatedly select subtasks and assign them the same phase.
This underscores the significance of choosing the summary task as the phase, ensuring it encompasses all activities associated with that phase as subtasks.
Follow the same process for milestones that are intended to serve as gates. Open the task list, click on the relevant milestones, navigate to the “Details” section, and designate the selected milestone as a gate.

Step 10: Define Gatekeepers for Gates
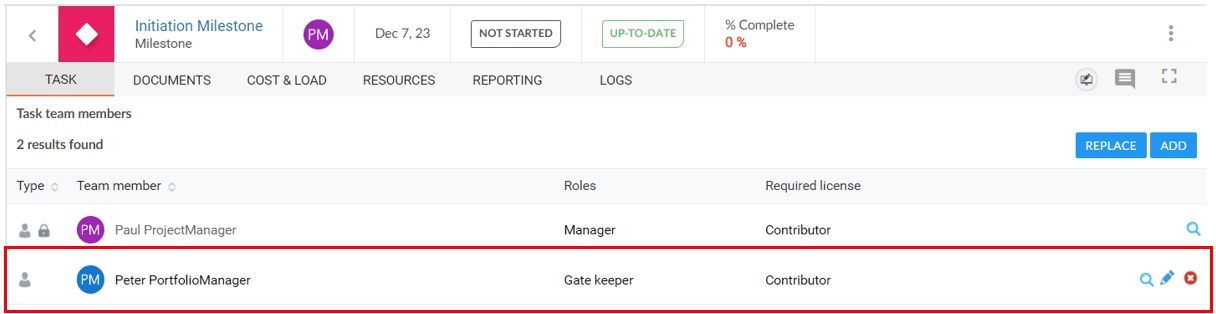
To designate a gatekeeper for each milestone, click on the corresponding task. Then navigate to the team section and assign an individual as the gatekeeper.
Step 11: Save a Baseline
Prior to initiating the project, it is imperative that you create and save a baseline for your entire project. Select “Schedule” and “Update baseline schedule”.
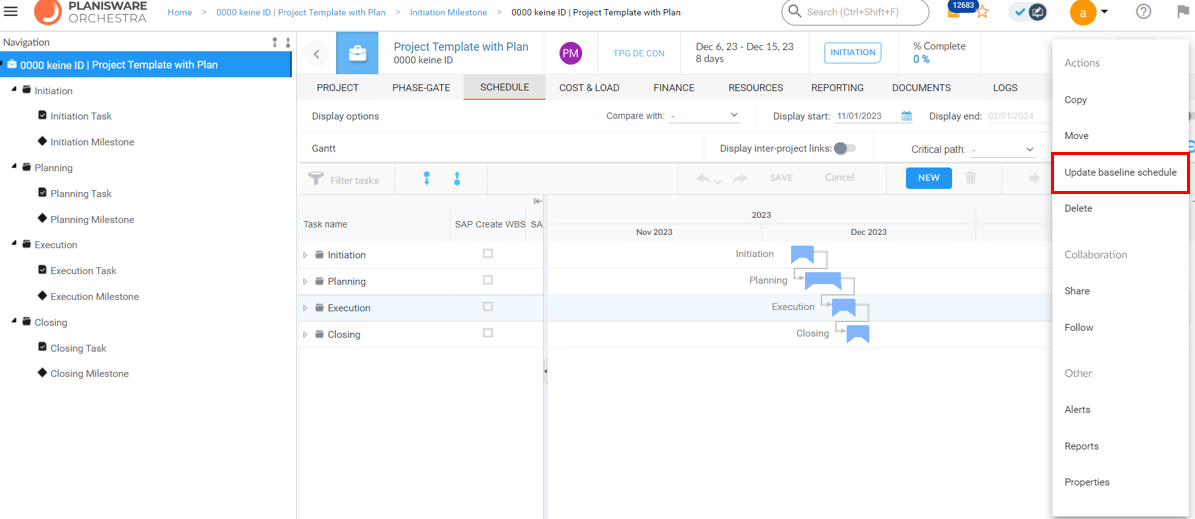
Overwriting this baseline at the task level should only be considered in exceptional circumstances and with careful consideration of the task details.
Conclusion: Planisware Orchestra Tutorial – 11 Steps to the Optimal Project Plan
In this Planisware Orchestra tutorial, you have learned how to create a well-structured project plan in 11 steps.
You now know the correct sequence when setting up a project. This includes, for example, how you:
- Define your project type, work packages as summary tasks
- Create a WBS with summary tasks
- Detail work packages by adding activities with tasks and milestones
- Define a stage and gate structure for your project
- Define gatekeepers for gates
- Save a baseline to monitor success.
The practical tips in this Planisware Orchestra tutorial have explained what you should pay attention to and what to avoid.
Our final tips:
Get to know the individually adaptable “PPM Paradise” – the optimal environment for your enterprise-wide project, program, portfolio and resource management (PPM). Download the free eBook “The PPM Paradise” now (just click, no form).
And sign up for our bi-weekly blog newsletter with information on more hands-on articles, eBooks, etc. to improve your project management maturity level.
Do you still have questions regarding this Planisware Orchestra Tutorial? Please do not hesitate to leave a comment below the post!
Subscribe to TPG BlogInfo: Never miss new practice-oriented tips & tricks
Every other week: Receive practical tips in TPG blog posts written by recognized experts in project, portfolio, and resource management.
* Required Fields | Data Protection
About the author: Hana Jurásková is a consultant at TPG The Project Group with 15 years of PMO and project management experience in the IT sector. Her expertise lies in PMO, resource management, change management and business system implementations within multinational environments. Throughout her professional journey her main focus area has been project & portfolio management systems.
Read more on Hana Jurásková on LinkedIn.


")