Are you a Microsoft Project beginner? In this case, this MS Project Tutorial is just the right reading for you. In 11 simple steps, you will get to know the most important MS Project basics for creating your project plan.
Plus, importantly, you will avoid typical pitfalls right from the start – things that often make new users worry, become uncertain and waste time. Our MS Project tutorial ensures that this will not happen to you!
MS Project Tutorial – 11 Steps at a Glance
- Define the project start
- Define the task mode
- Create tasks
- Structure project tasks
- Enter task duration and milestones
- Link tasks
- Define resources
- Assign resources
- Use deadlines instead of task constraints
- Set baseline
- Show project summary task
Step 1: Define the Project Start
After creating your project, you start with Step 1 of our MS Project Tutorial – with entering the start date. This is particularly important, as MS Project sets the start of all newly created tasks to the project start date by default. Effectively, this means that: the calculation of the entire project is based on the project start date.
As an alternative, you can enter the project finish date. In this case, MS Project automatically calculates the project start date.
Please note: In general, you should not use the calculation of the project finish date during the course of the project. As a matter of fact, delays can have the effect of moving unfinished tasks to the past.
In an early planning phase, however, it can make sense to set up planning with the calculation of the finish date. This allows you to calculate a theoretical start date and thus get valuable information on when to start the project. However, the calculation will not include a buffer. Therefore, you should subsequently go back to calculating from the project start date and set a deadline (see Step 9).
Note:
When calculating the project start date, all tasks start as early as possible. Thus, the earliest possible finish date for the project is calculated (forward calculation).
When calculating the project finish date, all tasks start as late as possible. Thus, the latest possible start date for the project is calculated (backward calculation).
To set the project start date in Microsoft Project, proceed as follows:
- Create a project or open an existing project.
- Open the Project tab.
- Activate the Project Information button.
- Select a date in the Start date field or enter the date manually.
- Confirm with OK.

If there are existing tasks in your project plan, the tasks without a linked predecessor are set to the project start date.
Step 2: Define the Task Mode
What is important: before you start creating the tasks, you must set a suitable planning mode. MS Project provides two different variants for this:
Manually Scheduled (default setting)
- Start date, finish date and duration are set by the project manager. This data is not changed by Microsoft Project.
- Warnings are displayed if the values entered lead to scheduling conflicts.
Auto Scheduled
- In this mode, MS Project calculates the tasks using relationships, constraints, calendars and other planning factors.
Our tip: Define the “Auto Scheduled” mode as your default and only revert to “Manually Scheduled” as needed. Changing the planning mode is possible at any time.
You have the choice: the task mode can be defined for one of the following:
- All new projects
- One individual project
- Individual tasks within one project
To define the task mode for all new projects, click File > Options > Schedule in MS Project.
In the Scheduling options area for this project, select All New Projects in the drop-down list. After this, you can select the desired scheduling mode under New tasks created.
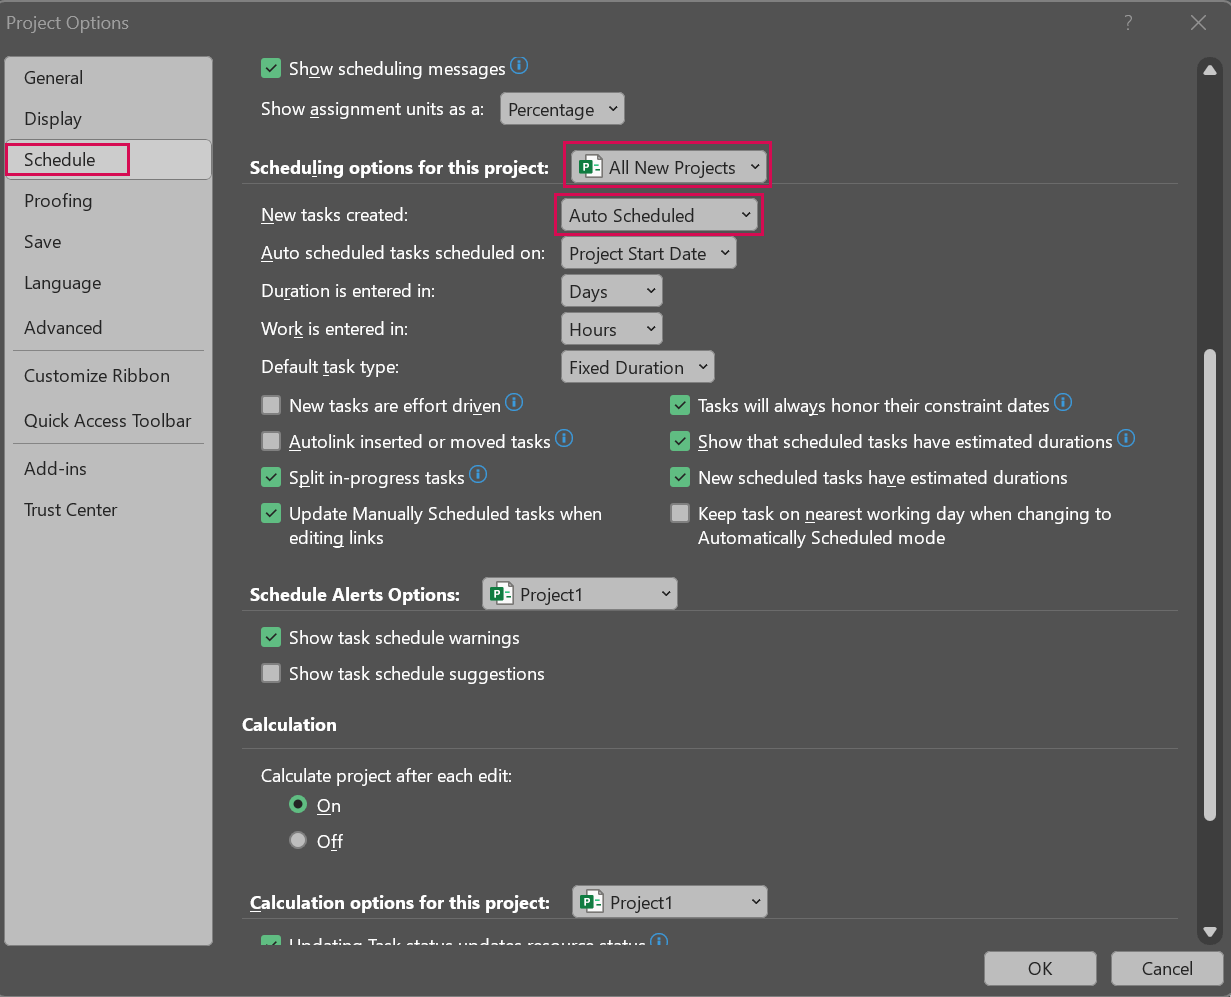
What is more, you can change the mode for an individual project in the input table of your project plan. You can also adjust the task mode of individual tasks via the column Task Mode.
Special Download: Advantages of MS Project Server / Project Online over MS Project Standard
Please click here to download the PDF and learn why you should prefer the server over the client version.
Step 3: Create Tasks
In the next step, you can already start creating the individual tasks.
Start by considering which tasks are necessary to achieve your project goals.
Our tip: When adding tasks, you should choose short, concise names that describe the task as precisely as possible. This is particularly important if you are working with Microsoft Project Server or Project Online in addition to the local MS Project version. In this case, employees you assign to your tasks can later report back to them on their own. Short, concise names are easier to remember and simplify the reporting process.
Always define tasks in the present tense. For instance, name a task “Develop database application” or “Write specification.” On the other hand, name milestones in the past tense, e.g., “Specification created.”
Of course, MS Project provides different options for creating tasks. You can enter Task Names in the input table or use the buttons in the Task tab.
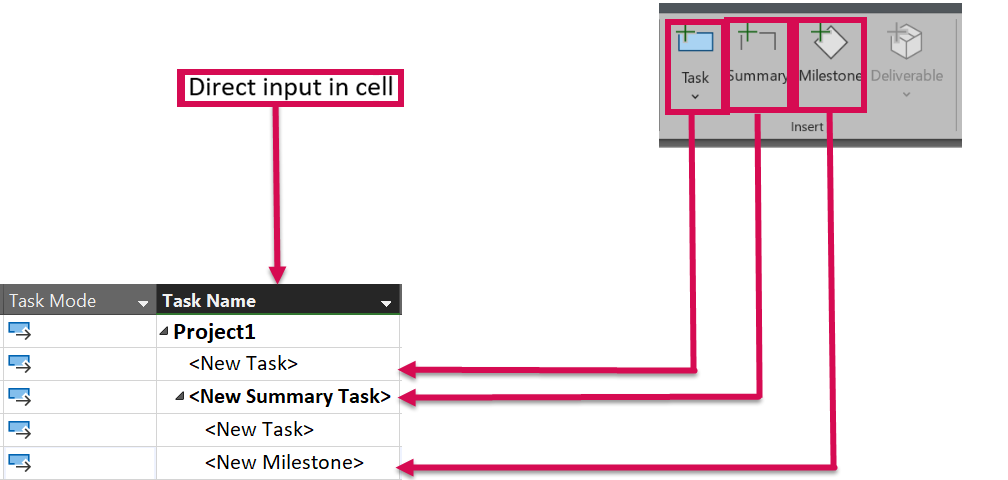
Step 4: Structure Project Tasks
A logical and content-related structure is indispensable in a sound project plan.
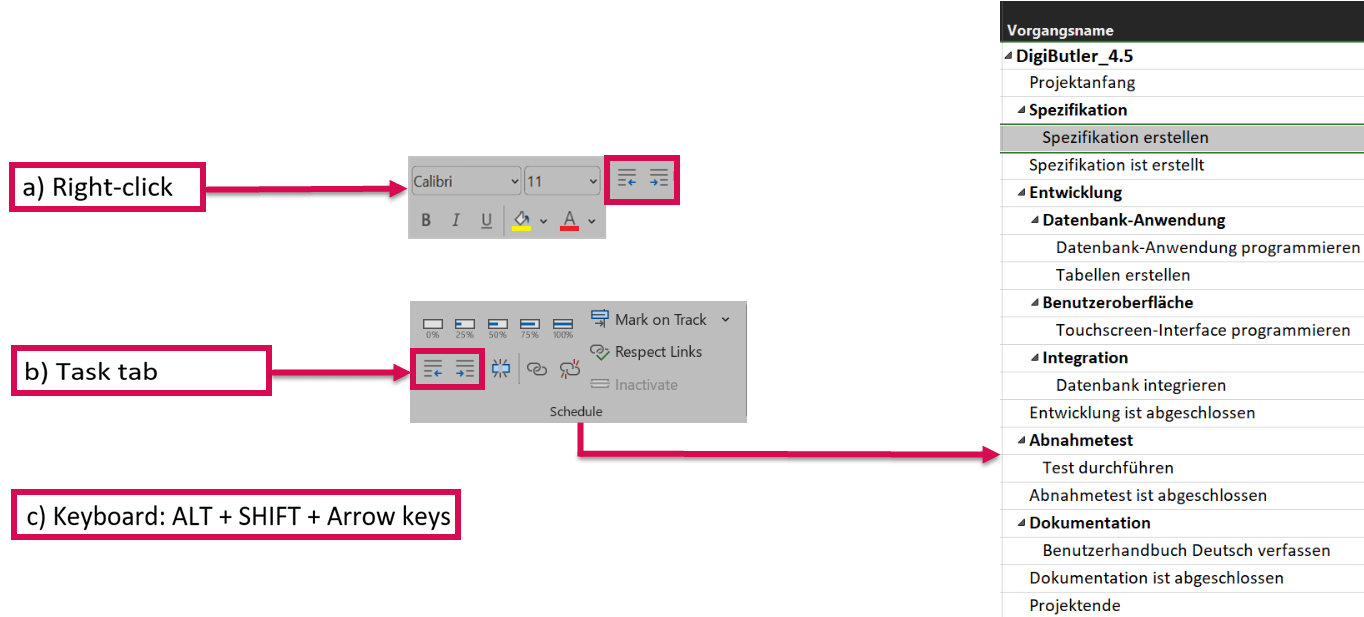
MS Project allows you to structure your project plan by indenting and outdenting the tasks via the so-called Summary Tasks. The Summary Tasks represent the phases of your project in this case.
The benefit of this: in automatically scheduled Summary Tasks, values such as Duration, Work, Start, Finish and Cost will be scheduled based on the sub-tasks. Thus, you always have an overview of the individual phases without necessarily having to look at all tasks.
This is how easy it is:
- You can either select the desired tasks and use the arrows in the Task tab to move them in or out or
- use the arrows by right-clicking on a task
- Advanced users may want to make use of the option of indenting or outdenting the tasks using the keyboard shortcut (ALT + SHIFT + arrow keys).
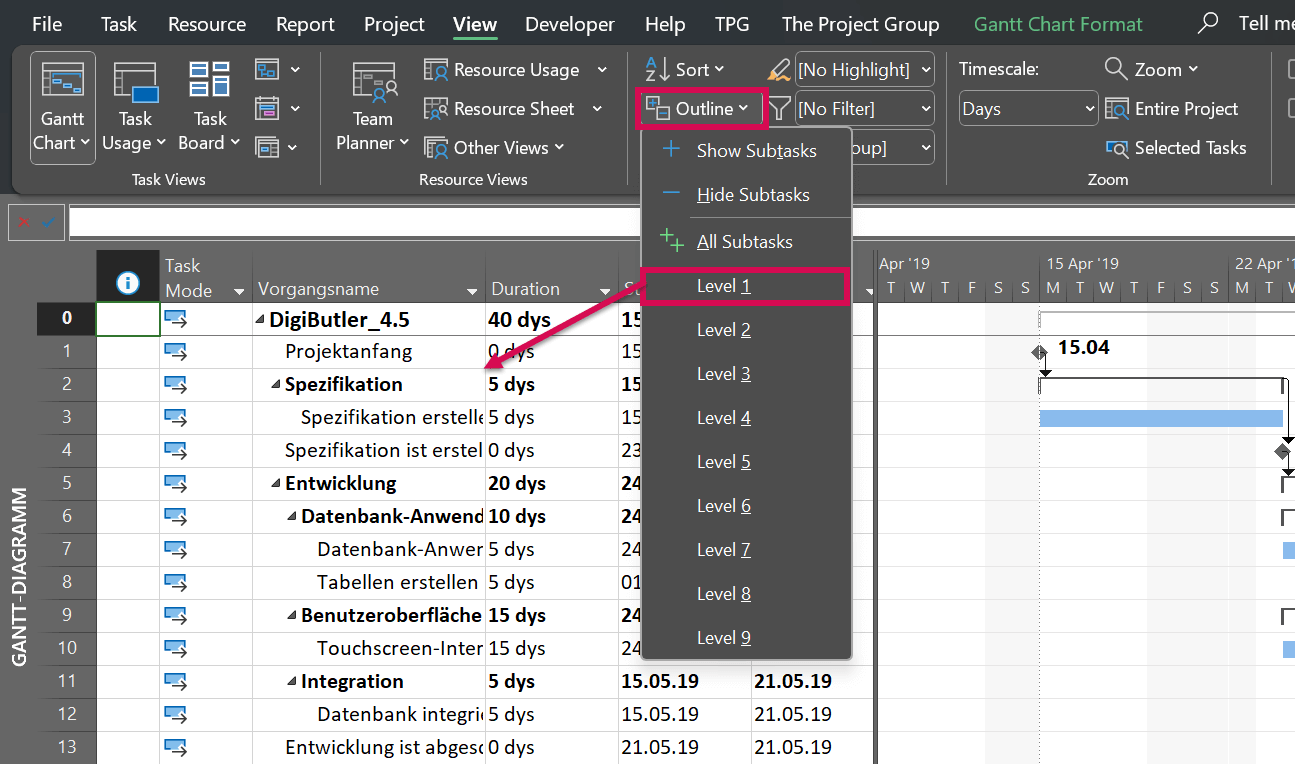
After structuring your tasks, you can continue adjusting your view so that only tasks of a certain level are shown.
For instance, if you prefer an overview of the phases only, you can very easily limit your view to the first outline level. To do this, change to the View tab and activate the Outline button. Select the desired outline level next.
Our reading tip: All you need to know about the Work Breakdown Structure (WBS).
Step 5: Enter Task Duration and Milestones
After creating and structuring all necessary tasks in the previous steps, you need to consider the duration of the individual tasks. More precisely: how much time is required to complete the respective tasks?
This is how you set the duration of the tasks:
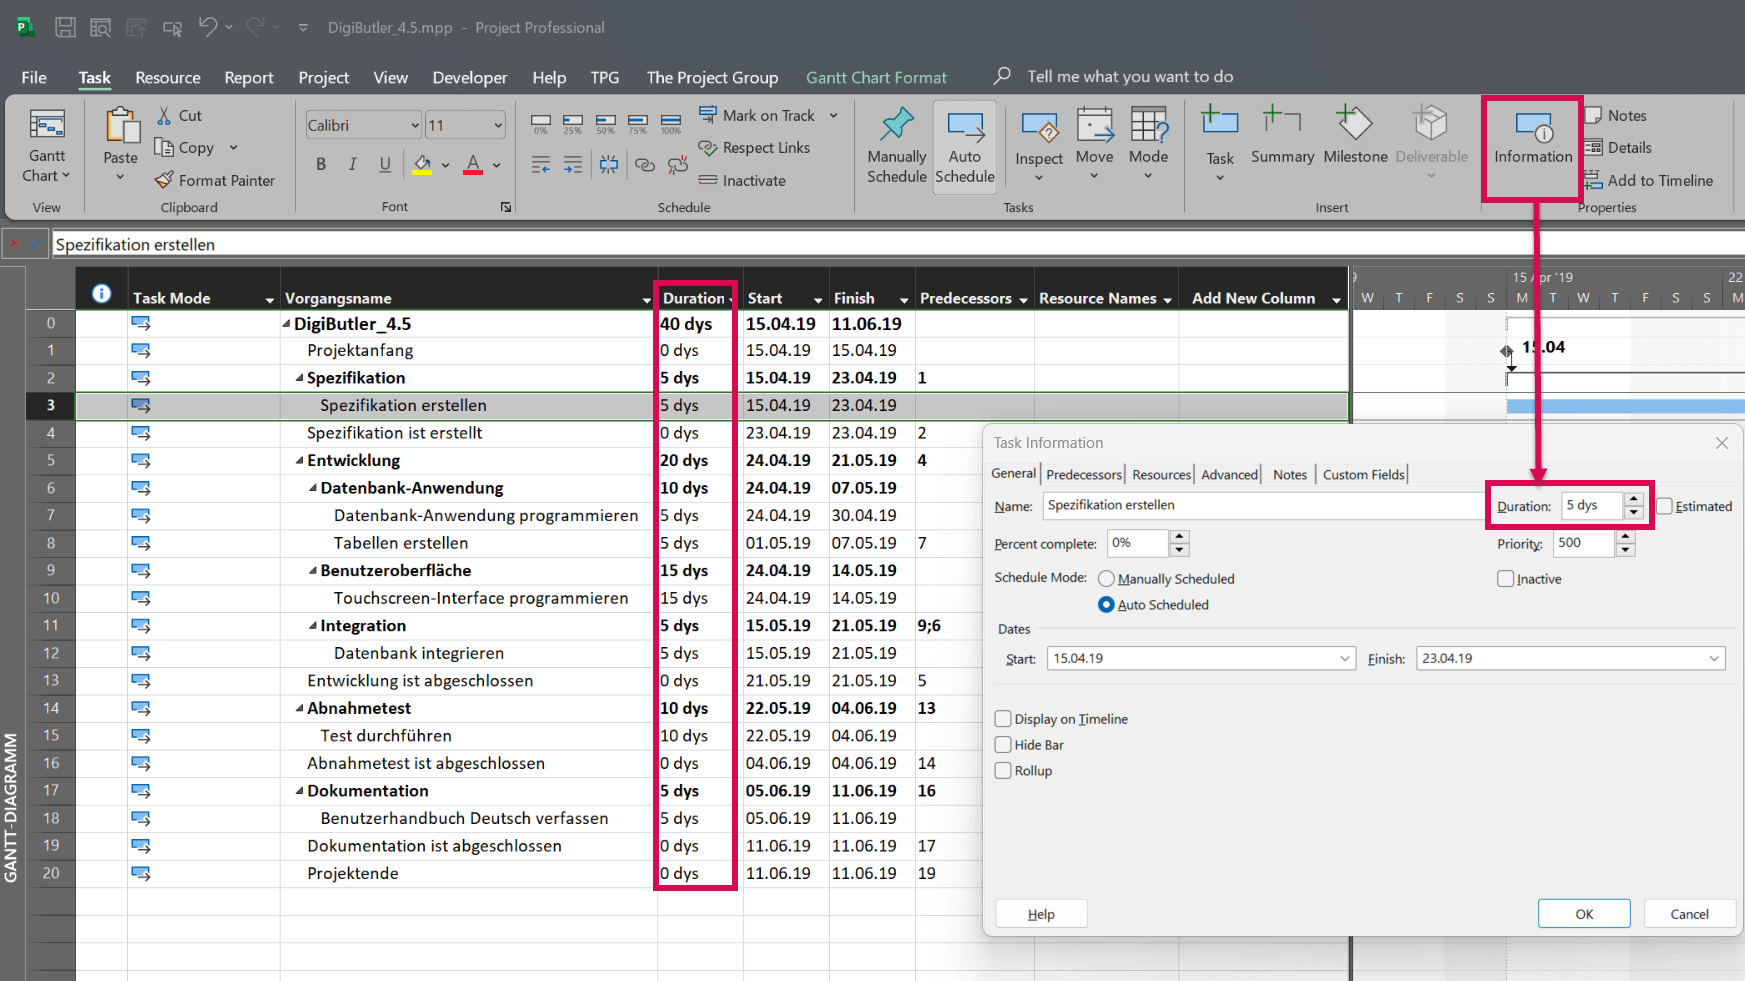
Enter the respective number of days in the Duration field. A greater or lesser degree of granularity (e.g., hours or weeks) is also possible. However, this is only recommended in exceptional cases.
The end of the tasks is now calculated automatically based on the working days defined. If you do not want to consider non-working days, you can use the abbreviation e (elapsed time) (e.g., 10 eDays). This is helpful for passive processes (such as the drying time of concrete) that are independent of public holidays. You can also enter the duration of tasks (by double-clicking on the task) via the Task Information.
Our tip: Do not enter start and finish dates for tasks manually. MS Project automatically calculates this information based on the project start date, task duration and links.
Note:
- Duration is the time period, it takes to complete a task – not the number of hours or days of work required.
- By default, MS Project assigns an estimated duration of “1 Day?” (can be changed in the options).
- Plan the tasks by entering the duration and corresponding links of tasks with Predecessor and Successor relationships.
- Use the scheduling mode “Auto Scheduled” and let MS Project calculate the Start and Finish dates.
This is how you define your milestones:
When entering the duration of tasks, you can also define milestones. A task will automatically become a milestone if you enter the Duration of 0. Milestones define the most important cornerstones in your project and are usually placed at the end of every phase.

Step 6: Link Tasks
When creating tasks, you will already have noticed the following: all tasks begin with the project start date.
The next step is to implement the logical dependencies of tasks with links on the timeline. For instance, a developer can only start developing an application once the corresponding specification has been completed (as we all know, it does not work so well spontaneously 😉).
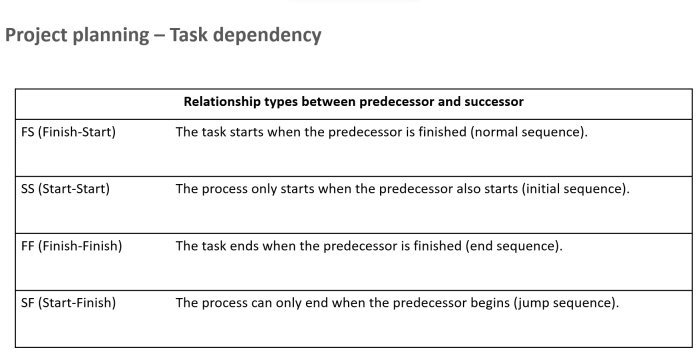
Therefore, we are dealing with a sequential succession of tasks. This is where so-called Finish-to-Start relationships come in.
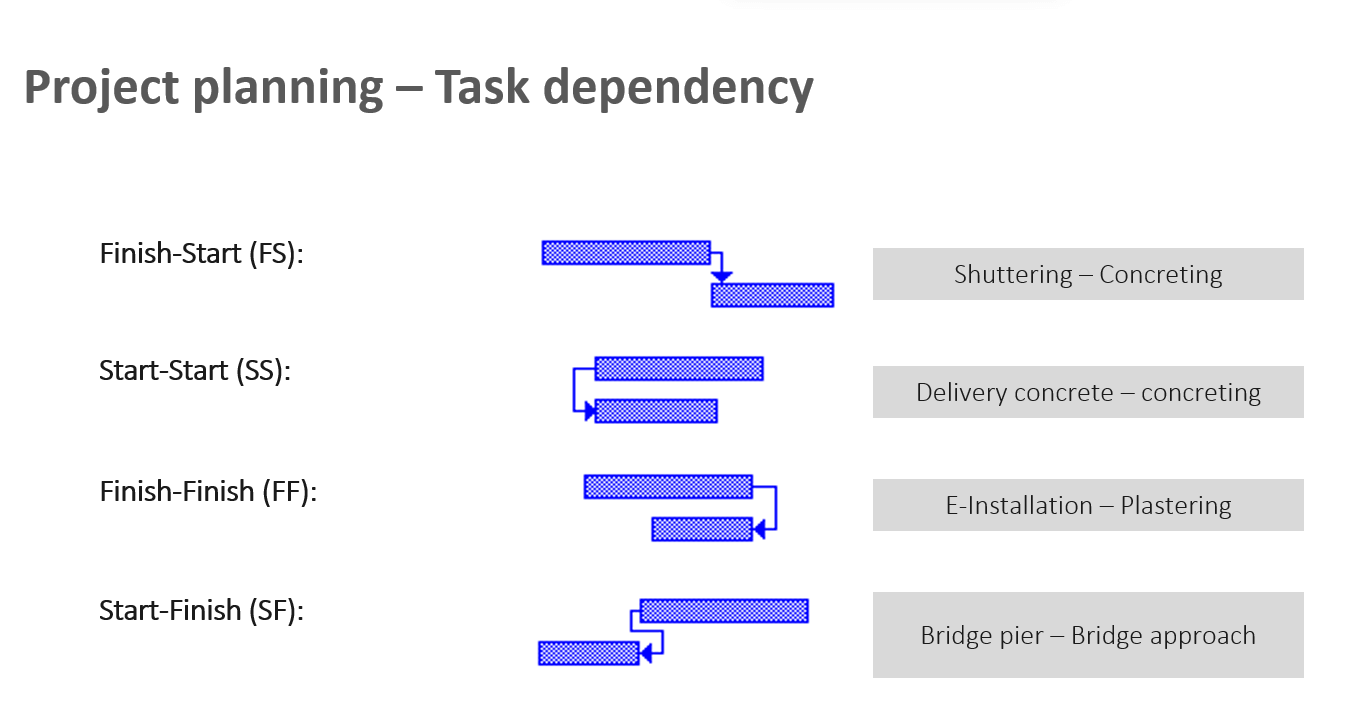
Choose from different link types.
MS Project offers you the option of choosing between different types of links for special scenarios. Here is an overview:
Now, you select the tasks that you want to link.
As is often the case in MS Project, there are several options for linking tasks.
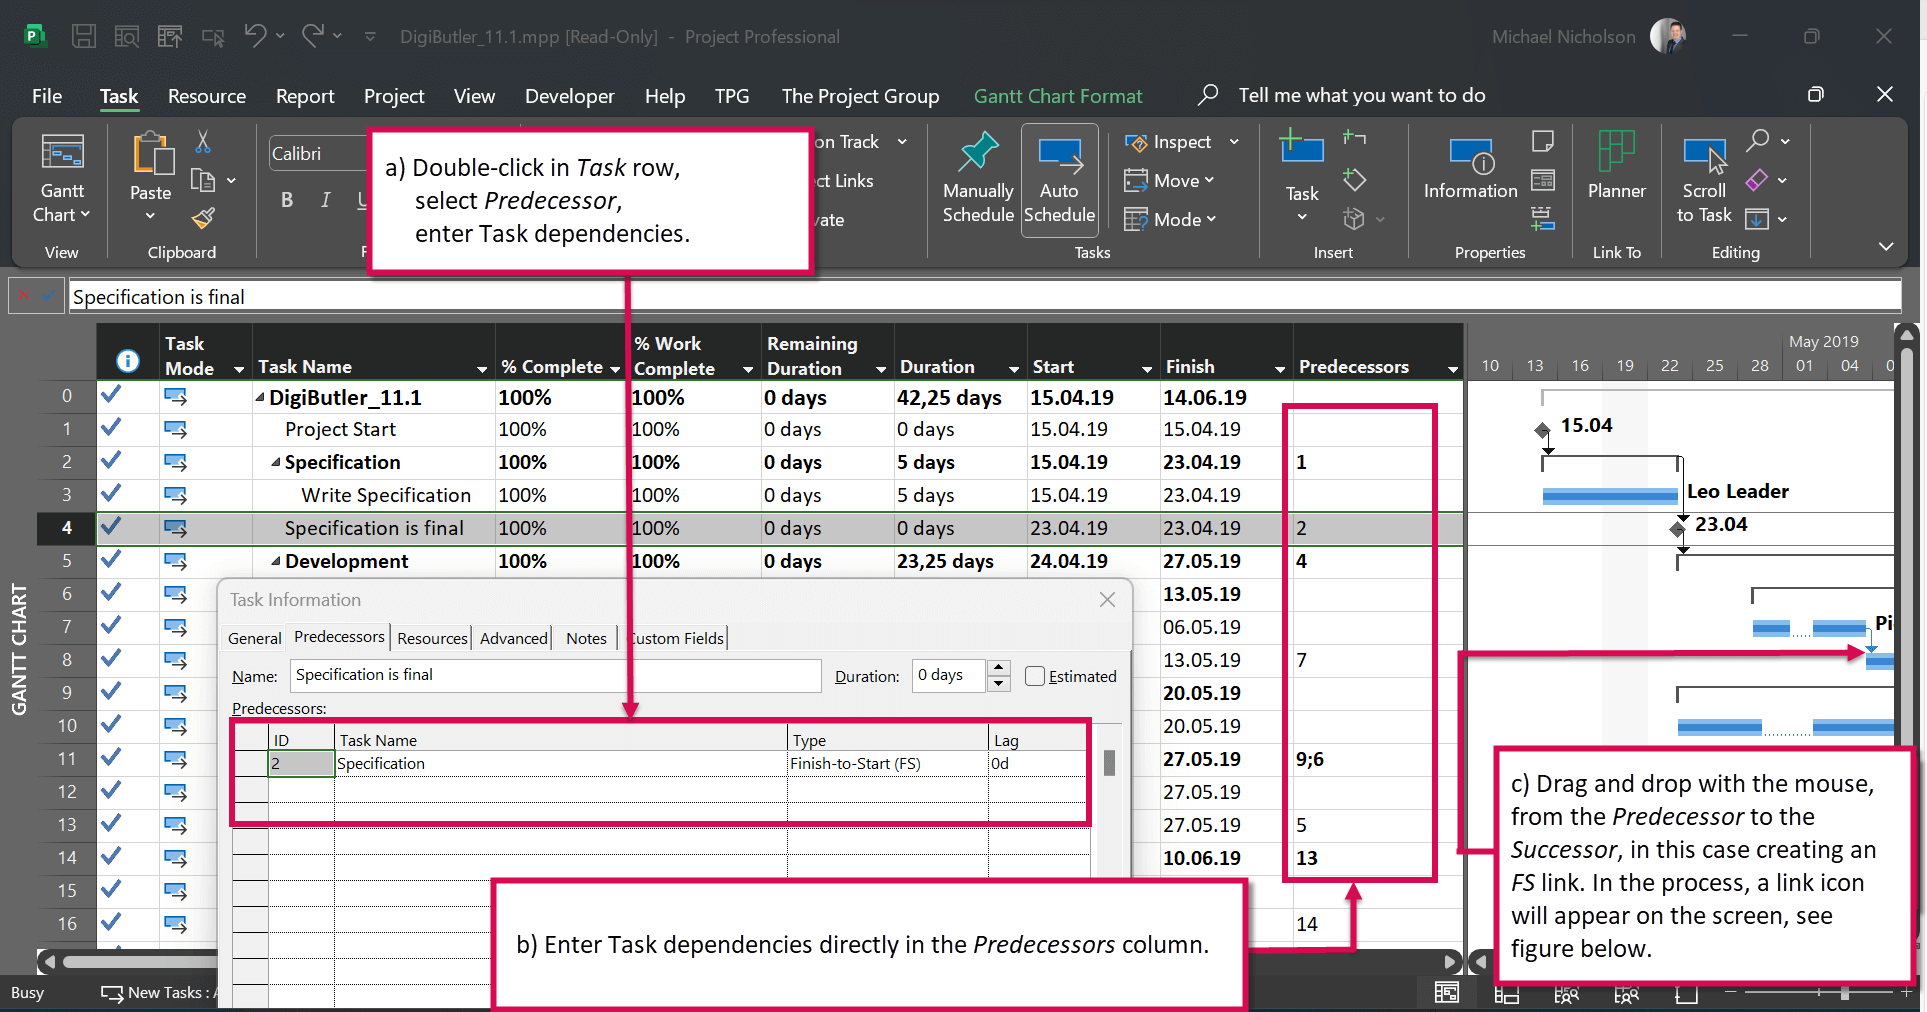
- Double-click on the task > Tab Predecessors: Here, you can select the respective predecessor of the task via drop-down. The link type can be selected via drop-down as well. What is more, you can set a time interval (Lag). However, this is not to be understood as a buffer that can be used up, but as a fixed interval (e.g., after painting work, a time interval of 2 days must be maintained so that the paint can dry. No pictures can be hung before then).
- Direct table input of link type in the Predecessor column: In this case, you can select the predecessor likewise via drop-down. It is also possible to enter the row number of the task to be linked directly in the cell. Link types other than Finish-to-Start must be entered via abbreviation behind the row number of the linked task (e.g., 1SS = Start-to-Start with Task 1).
- With the mouse in the Gantt chart: You can also create a link by dragging the mouse from one task to the other. Thus, a Finish-to-Start relationship (FS) is created automatically. By double-clicking on the link line, you can change the link Type and Lag.
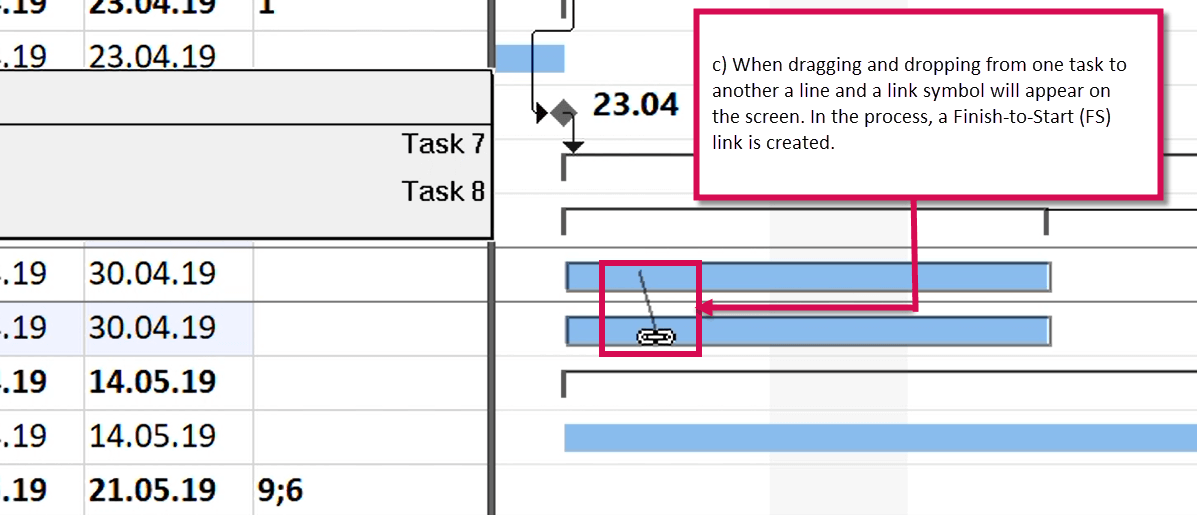
- Selecting the Predecessors and Successors via the Link icon: With this method, you select two tasks and click on the Link icon in the Task tab.

Step 7: Define Resources
In the previous 6 steps, you have defined the timeline for your project. To be able to meet your scheduled deadlines as well as keep track of costs and materials, you should think about the necessary resources for implementing your project now.
Make a generic plan first.
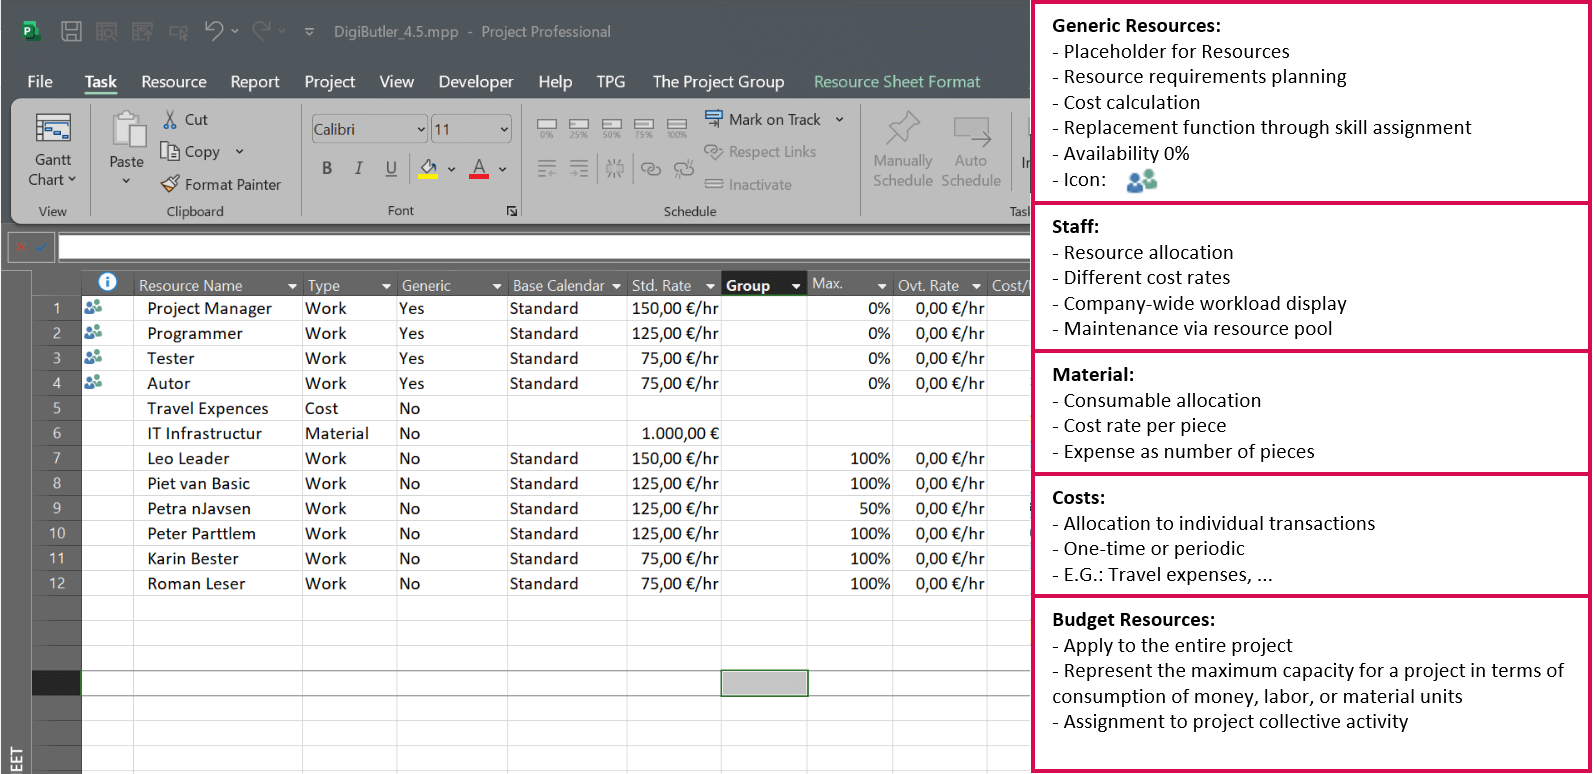
When you start planning your project, it may not yet be clear which named resources will be part of your project team. Using generic resources gives you the opportunity to evaluate your resource requirements in advance.
And this is how it works: To add resources, MS Project provides you with the Resource table with resource types. Here, you can create the following resources in table format:
- Staff resources
- Cost resources
- Material resources
To open the resource table, click the View tab and activate the Resource: Table button.
You can also set a standard rate for Staff resources. With this, the corresponding costs will be automatically calculated when assigning the resource. In the case of Material resources, you enter Cost per item.
By clicking Add New Column, you can add additional columns, such as Generic, if you want to class a resource as a generic resource (e.g., developer, project manager, etc.).
Step 8: Assign Resources
Meanwhile, you have assembled your resources. Now, you would like to assign the appropriate employees to your tasks.
And this is how it works: Via the View tab and the Gantt Chart button, change back to the Gantt Chart. Here, you have the following options to assign resources:
- Direct input in the Resource Name column
- Via the Assign Resources button in the Resource tab
- In the Task Form: Details view: To do this, change to the View tab, check the Details box and select the corresponding view. The form will now appear below the task table and is always in the context of the selected task.

Note:
When resources are assigned, the work is calculated (Work column). The calculation is based on the formula:
Work = Duration * Units * Hrs/Day
Example: The duration of a task is 5 days. The working time is 8 hours per day / 40 hours per week. The resource is 100% available for project work.
5 days (duration) * 1 (units 100%) * 8 hours (working time per day) = 40 hours (work)
Our reading tip: You can find many articles on resource management here.
Step 9: Use Deadlines instead of Task Constraints
Some of your tasks and milestones are likely to be subject to fixed delivery dates.
MS Project offers the option of defining fixed deadlines for tasks and milestones. For this, you use the constraint type Must Finish On.
The problem with this option: It can lead to inconsistencies in your project plan. This is because finish dates do not change if linked predecessors are delayed. Thus, it could happen that a task with a constraint might start before the finish date of its predecessor.
Fortunately, there is a nicer solution for this case: the creation of deadlines.
When using deadlines, the corresponding tasks or milestones are not “fixed” but take their logical links into account and will shift accordingly if applicable.
But do not worry. In the Indicator column, MS Project signals very clearly when a deadline will be “breached” according to the current planning status. This allows you as a project manager to initiate appropriate action at an early stage. In addition, the deadline is shown with a graphical indicator (green arrow) in the Gantt chart.
Our tip: To set deadlines, it makes sense to add the Deadline column to the input table. Alternatively, you can also maintain deadlines in the Task Information dialog box.

Step 10: Set Baseline
With the previous steps, you have created a complete project plan. However, before you start with the implementation, you should save the initial planning status.
Let us be honest – very few projects go 100% according to plan – and you will certainly want to draw a comparison between target and actual during the project or at the end.
For this kind of target-actual comparison with MS Project, the tool provides the so-called baseline functionality with various reports. It allows you to save up to 11 baselines for your project. The first baseline is usually saved after the initial planning. During the implementation phase, you can save additional baselines.
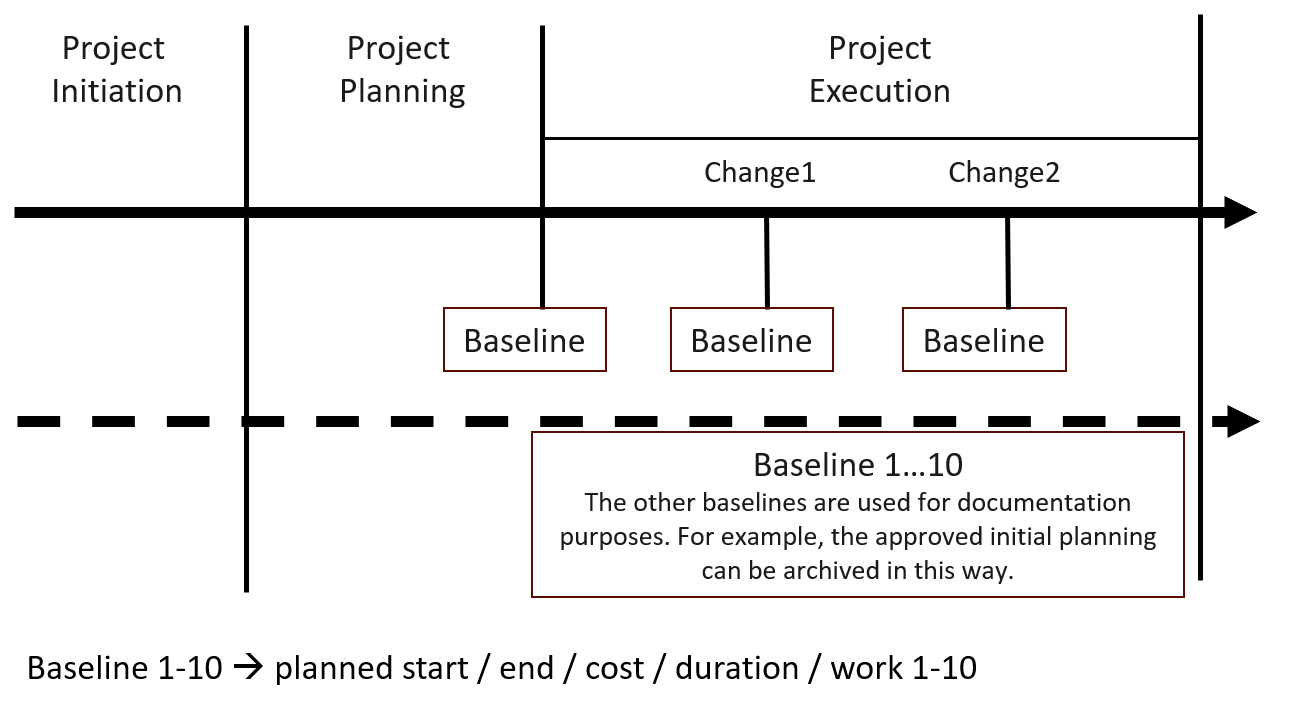
Baselines are saved in separate baseline columns. The most important baselines at a glance:
- Planned Start (0-10)
- Planned Finish (0-10)
- Planned Duration (0-10)
- Planned Work (0-10)
- Planned Cost (0-10)
By the way, variances are also calculated automatically:
- Start Variance
- Finish Variance
- Duration Variance
- Work Variance
- Cost Variance
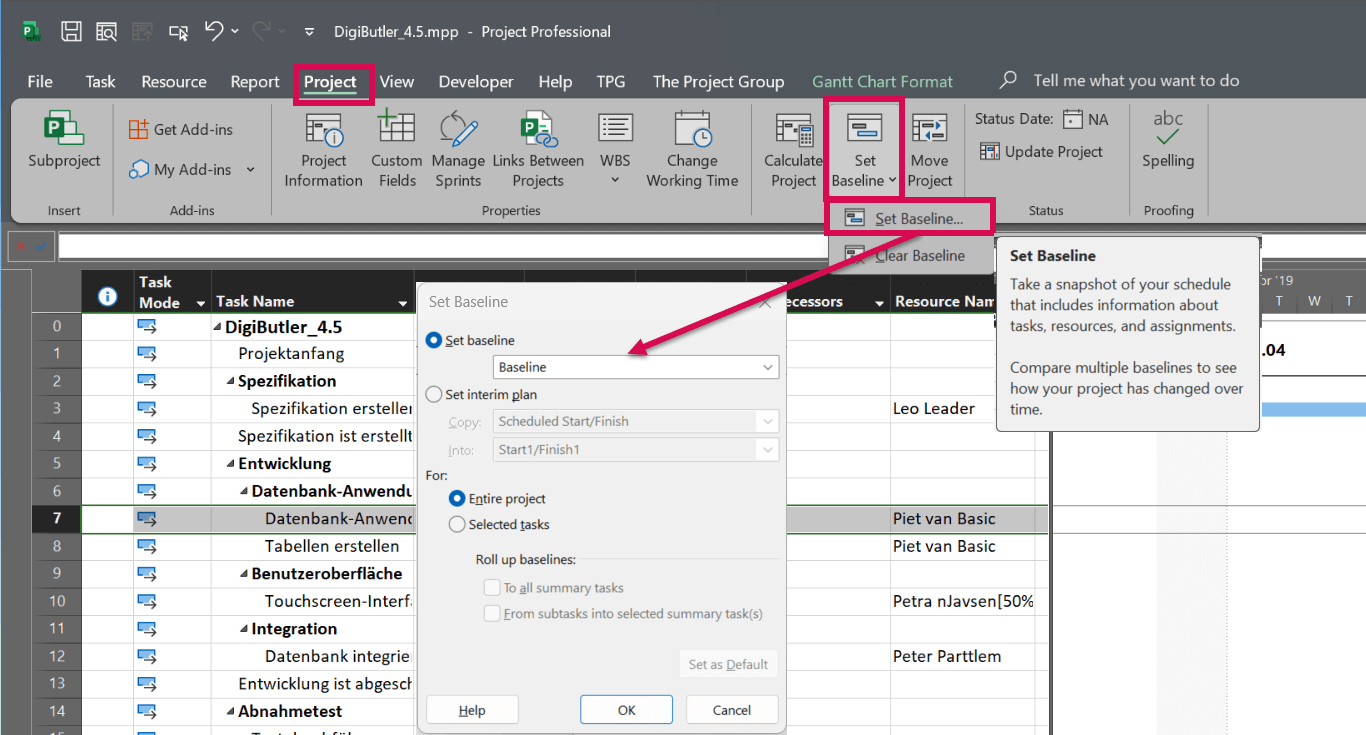
And this is how it works: To set a baseline, change to the Project tab and activate the Set Baseline button. Select the baseline you would like to set and confirm with OK. It is also possible to save only certain tasks in the baseline.
Our tip: Open the View tab and select Gantt Chart: Tracking Gantt to compare your current planning to the baseline. The baseline will be shown in the form of grey bars in the Gantt Chart.
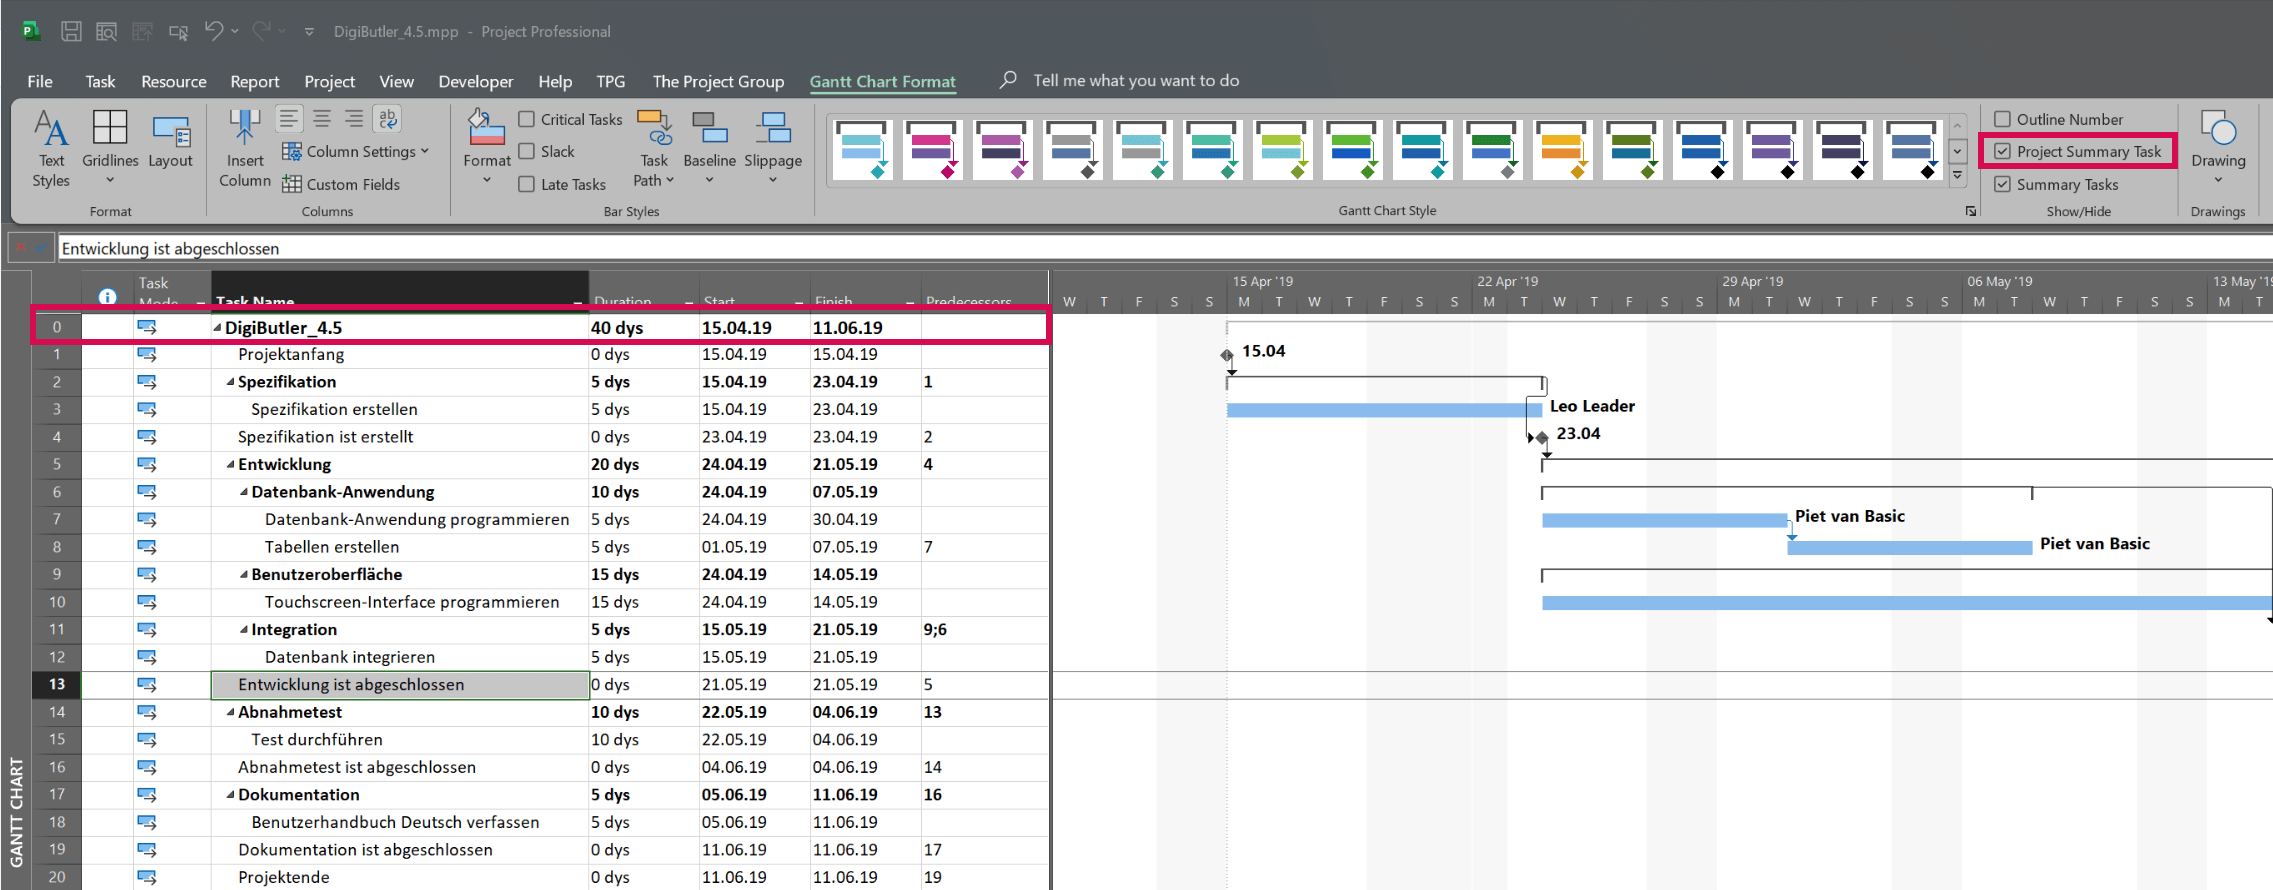
Step 11: Show Project Summary Task
To keep track of the overall project, it is advisable to display the so-called Project Summary Task.
After activation, this will be shown in row 0. It provides valuable information on Start, Finish, Work, Duration and Cost for the overall project.
Thus, you always maintain an overview without having to do the math yourself. Incidentally, the calculation works in exactly the same way as for Summary Tasks. Only, in this case, it refers to all tasks in your project.
To show the Project Summary Task, change to the Gantt Chart Format tab and check the Project Summary Task box in the Show/Hide group.
Conclusion – MS Project Tutorial: 11 Steps to the Perfect Project Plan
In this MS Project tutorial, you have learned how to create a good project plan in 11 short steps, which provides an excellent basis to continue working on your project.
You now know the correct sequence when setting up a project and know how to:
- Set a project start date
- Create, schedule and structure tasks and milestones
- Define resources and assign tasks
- Handle fixed deadlines
- Save baselines to monitor success
The practical tips have explained what you should pay attention to and what to avoid.
Our final tips:
Get to know the individually adaptable “PPM Paradise” – the optimal environment for your enterprise-wide project, program, portfolio and resource management (PPM). Download the free eBook “The PPM Paradise” now (just click, no form).
And sign up for our bi-weekly blog newsletter with information on more hands-on articles, eBooks, etc. to improve your project management maturity level.
Has this MS Project tutorial been helpful or do you have any questions? Please leave a comment below.
Subscribe to TPG BlogInfo: Never miss new practice-oriented tips & tricks
Every other week: Receive practical tips in TPG blog posts written by recognized experts in project, portfolio, and resource management.
* Required Fields | Data Protection
The author:
Johannes Koschinski, PSM I
Head of PPM Consulting, PM ExpertJohannes Koschinski is a Microsoft certified senior consultant with a focus on traditional / agile / hybrid project and portfolio management as well as process management based on Microsoft technologies. Over the past years, he has gained a wealth of practical experience as a trainer and consultant for PPM solutions in different industries. Since 2022, he has been Head of PPM Consulting at TPG.
Read more about Johannes Koschinski on LinkedIn.


2 Comments
Very useful and compact post, good guide for people starting on project planning in the bet way
Thanks for your feedback, Ignacio! Good to hear the article is useful and compact at the same time.