


Are you working as a project manager? Is your company using Planisware Enterprise for scheduling? Do you have basic knowledge of how to navigate in Planisware Enterprise? Then this Planisware Enterprise Tutorial will be just what you need to successfully navigate it. In 11 simple steps, you will learn the most important Planisware Enterprise basics to create your project plan.
- Step 1: Create a project from a template
- Step 2: Set the start of the project
- Step 3: Create activities
- Step 4: Structure project plan
- Step 5: Enter task duration and create milestones
- Step 6: Link activities
- Step 7: Set constraints or inactivate automatic calculation for some activities
- Step 8: Plan resources
- Step 9: Plan expenditures
- Step 10: Data consolidation at project and WBS level
- Step 11: Save baseline
- Conclusion – Planisware Enterprise Tutorial
Interested in Planisware Orchestra rather than Planisware Enterprise?
Please, read our corresponding Planisware Orchestra Tutorial.By the way, we also have an MS Project Tutorial on this blog.
Step 1: Create a Project from a Template
The optimal Planisware Enterprise project plan starts by following the process approved by your company. The usage of project templates helps you to retrieve the corresponding WBS structure, tasks, milestones, and settings that have been defined for your company. You will also be able to adjust your plan according to your needs.
Depending on the processes within your company, it could be that permissions to create a new project are limited to specific user groups, e.g., PMO or administrators. In this case, please start with step 2 of this tutorial.
To create a project from a template in Planisware Enterprise, proceed as follows:
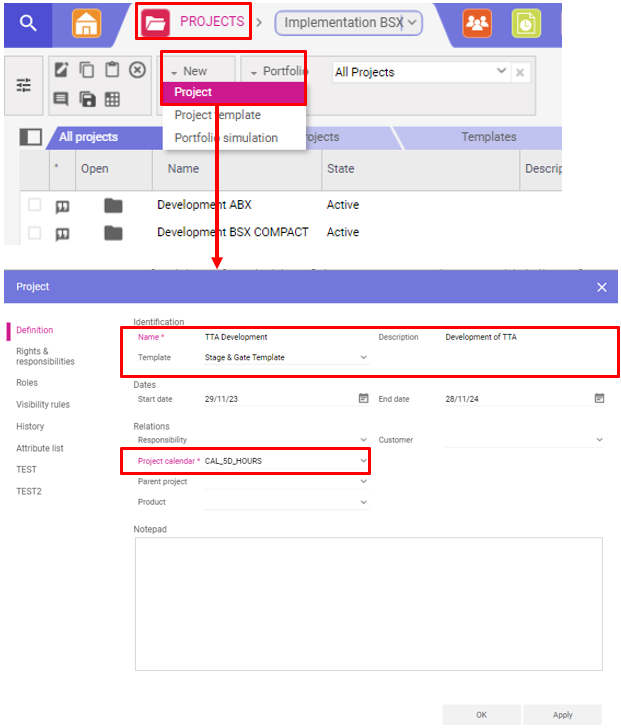
- Go to the Projects Home Page in the PROJECTS module and go to the toolbar. Select the New dropdown and choose Project. The attribute sheet to create a new project will appear.
- Insert name and description.
- Select the corresponding template matching your need.
- Some additional fields may need to be filled in. Mandatory fields are marked with an asterisk *. Please respect your company’s project creation process.
- Click OK to confirm.
Step 2: Set the Start of the Project
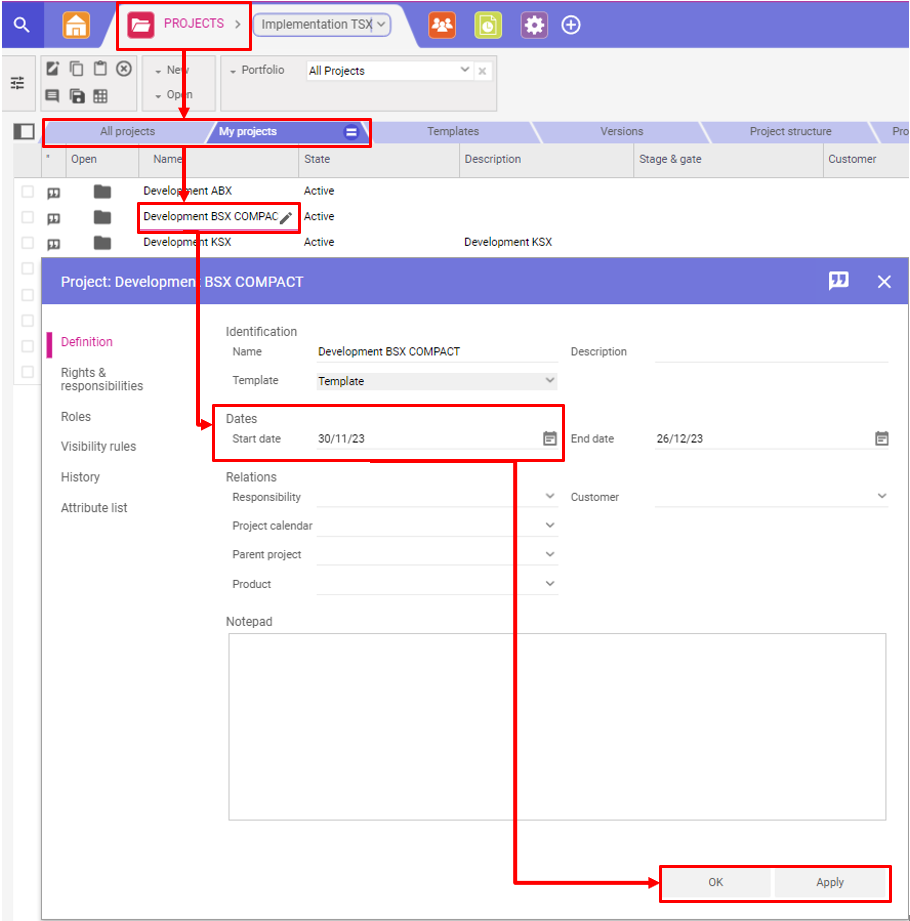
After you have created your project, start with step 2 and enter the start date. This is especially important because Planisware Enterprise sets the Planned start of all tasks that do not have any constraints or predecessor to the project start date. This means that the calculation of the entire project is based on the value defined in the field Start date.
In the field End date, you can define the end of the time window for a project. This is not the same as the field Planned finish which is calculated automatically based on the scheduled activities in the plan.
Please note: When calculating the project Start date, all tasks start as early as possible. This also calculates the earliest possible Planned finish date for the project.
Be aware that the field End date is not the same as the automatically calculated field Planned finish.
To set the project Start date in Planisware Enterprise, proceed as follows:
- Go to the Projects Home Page in the PROJECTS module and navigate to the tab All projects or My projects.
- Click the Name column or use CTRL+E and go to Project Definition.
- In the field Start date, select a date by clicking on the calendar symbol or enter the date manually.
- Click Apply or OK to confirm.
Step 3: Create Activities
In the next step, you can start creating new activities.
In Planisware Enterprise, there are two different kinds of activities: WBS elements and tasks. Milestones are tasks without duration. WBS elements (= Work Breakdown Structure elements) represent the phases and the overall structure of your project.
To learn more about WBS, read our article on the Work Breakdown Structure.
First, think about what WBS elements and tasks are necessary to achieve your project goals, if they are not yet part of the structure provided by the template.
Our tip: When entering tasks, you should choose short, concise names that describe the task as precisely as possible. In this case, employees you assign to your tasks can later report back to them on their own. Short, concise names are easier to remember and facilitate the feedback process.
Always define the task in the present. For example, name a process “Developing a Database Application” or “Writing Specification”. And name milestones in the past tense, e.g., “Specification created”.
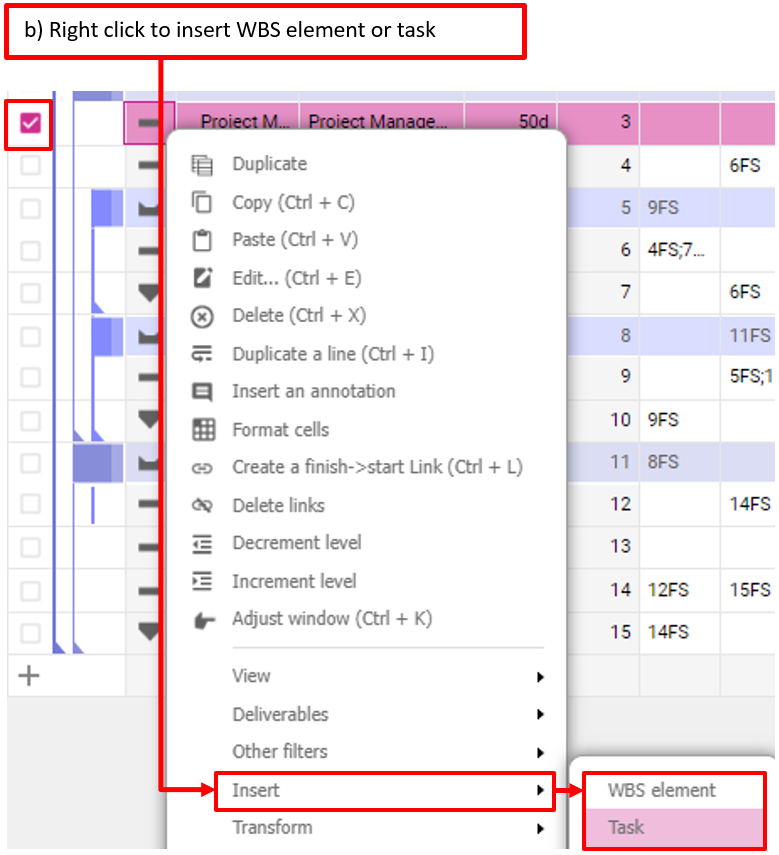
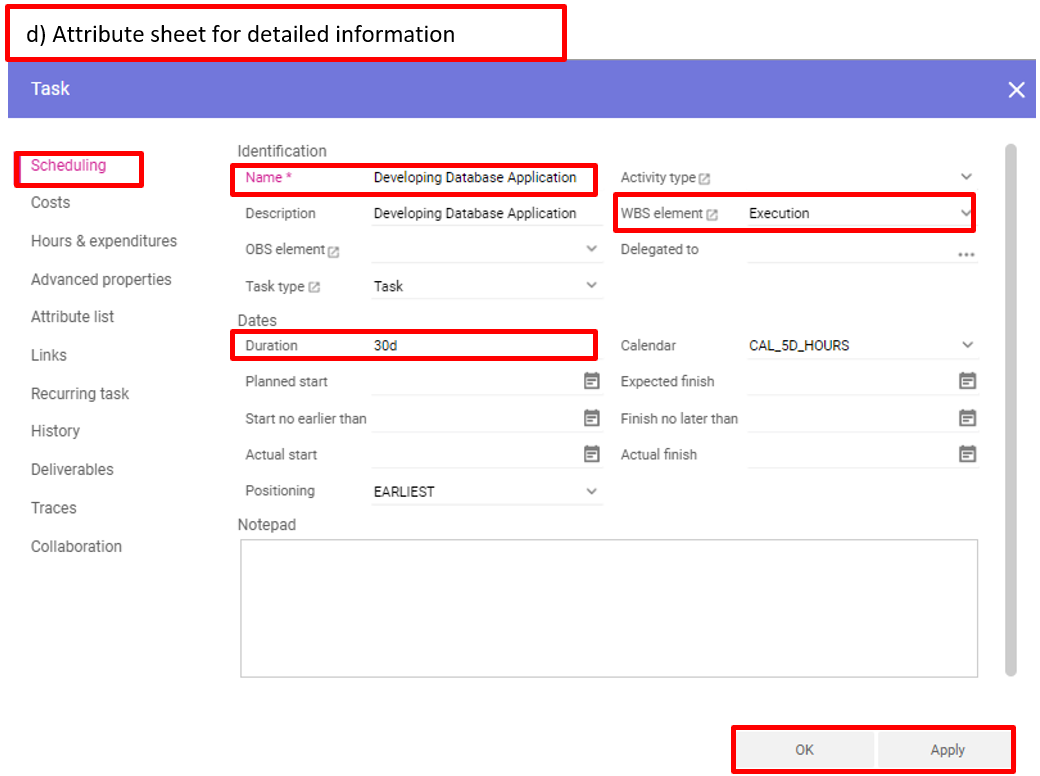
Planisware Enterprise offers various options for creating activities. You can enter activity names in the input table, use the Insert WBS element or Insert Task function in the tool bar or right-click and choose Insert WBS element or Insert Task.
This is how it works:
1. Go to the PROJECTS module and open a project
2. Go to Data page or Gantt page
3. Use one of the following ways to insert an activity:
a) Direct input table is useful if you want to add a task at the bottom of your plan
b) If you want to insert a new activity below an existing activity, tick the activity, right-click, and select Insert WBS element or Insert task or
c) Use Insert WBS element or Insert Task in the toolbar

d) If you use option b or c, the WBS element or Task attribute sheet will open automatically, and you can fill in detailed information.
Interested in Planisware Enterprise?
At TPG, we provide consulting and a free individual product demo.
Step 4: Structure Project Plan
A logical and content-related structure is indispensable in a neat project plan.
Planisware Enterprise offers you the possibility to structure your project plan by moving activities, by decrementing or incrementing activities and by transforming WBS elements into tasks and the other way round.
This is how it works:
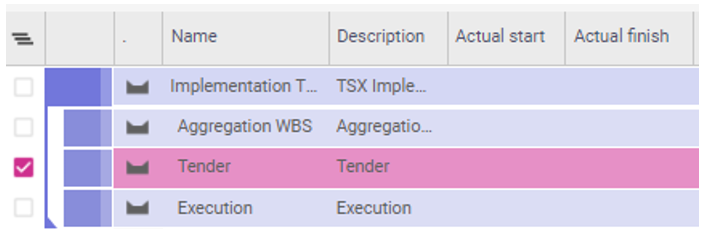
a) Tick the checkbox for the activity you want to move and drag and drop it to the part of the schedule where it should be shown.
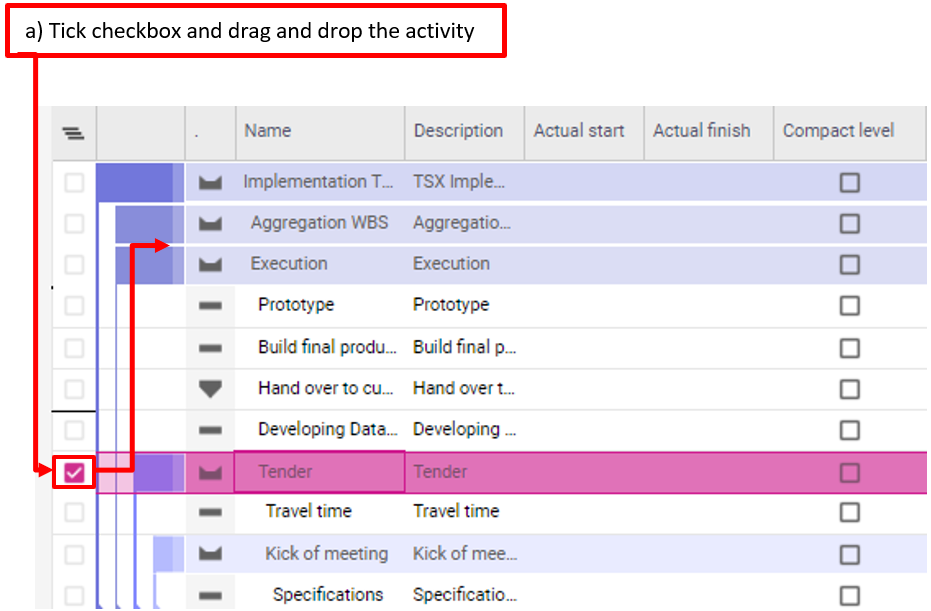
The order of the activities has been changed.
b) By clicking Decrement level or Increment level in the tool bar or with right click, you can change the level of the activities. A task will automatically be transformed to a WBS element as soon as you increment the level of the activity below.
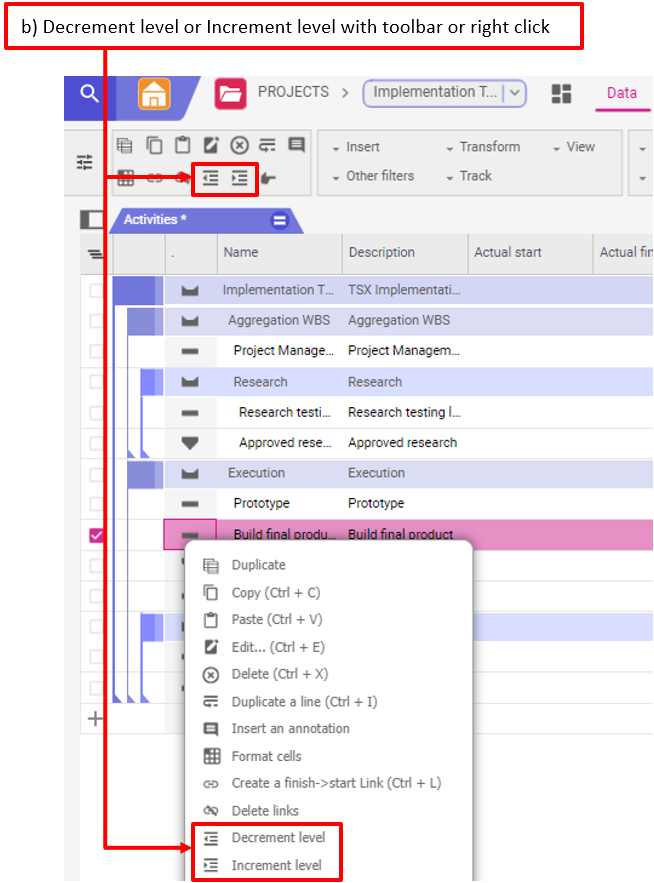
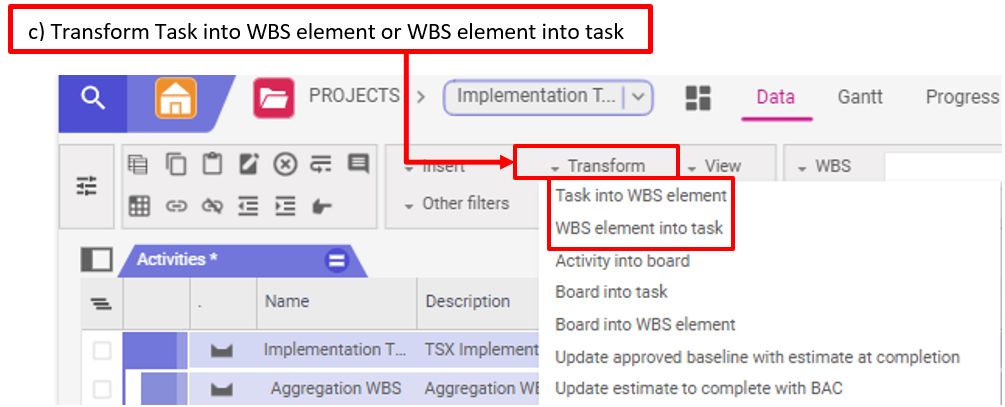
c) A WBS element can be transformed back to a task by clicking Transform – WBS element into task if there is no child activity below it.
A task can be transformed into a WBS element by clicking Transform – Task into WBS element even if there is no activity below it.
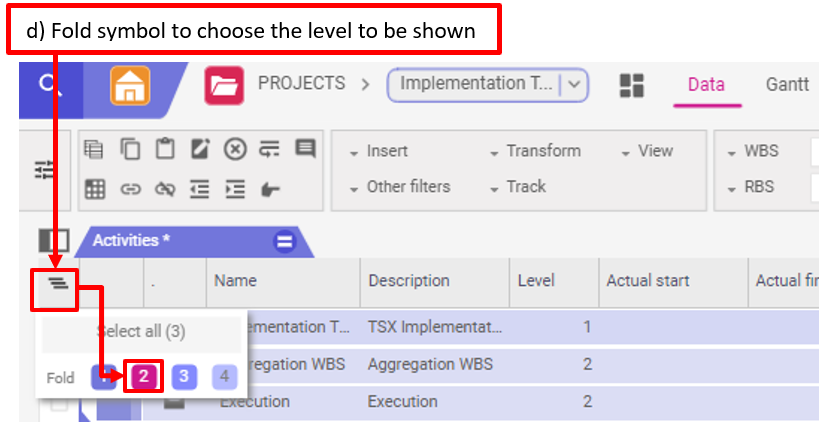
d) Once you have structured your issues, you can customize your view even further to show only tasks or WBS elements at certain levels.
For example, if you only want an overview of the phases, you can easily limit the view to this level. To do this, click on the fold symbol on the top left of the table and choose level 2.
Step 5: Enter Task Duration and Create Milestones
After you have created and structured all the necessary activities in the previous steps, the question arises as to the duration of the individual activities. Specifically, how much time is necessary to complete the respective activities?
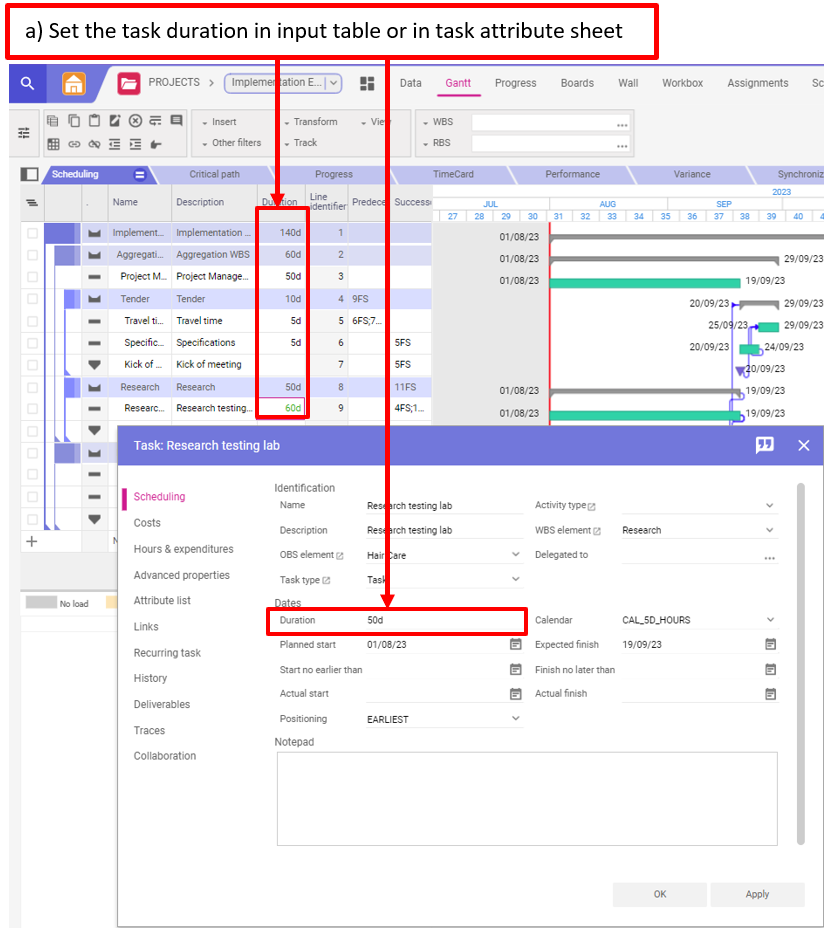
a) Set the task duration
Enter the appropriate number of days in the Duration field.
The Planned finish of the task is now automatically calculated based on the Planned start combined with the duration. If a calendar is assigned, non-working days are automatically considered.
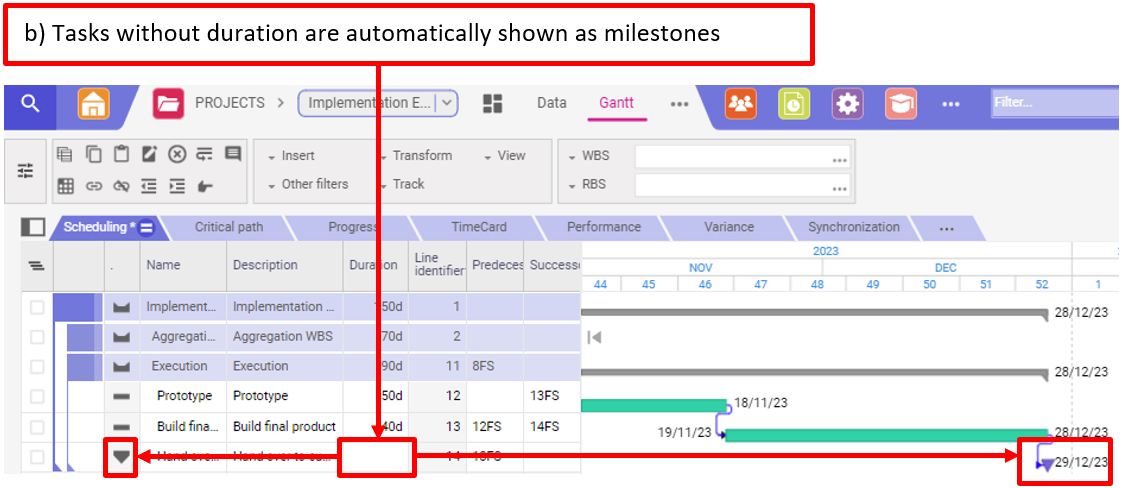
b) Create a milestone
Milestones as the most important cornerstones in your project are usually placed at the end of each phase.
In Planisware Enterprise, milestones are tasks without duration.
Tasks that are newly created are automatically added without duration and the checkbox in field Is a milestone? is automatically ticked. If you do not add a duration, the task will stay as a milestone.
Please note:
- Duration is the amount of time it takes to complete a task, not the number of hours or days of work required.
- By default, Planisware Enterprise creates new tasks with without duration and flags them as milestones until you add a duration.
- Schedule tasks by entering the duration and linking tasks with predecessor and successor relationships.
Step 6: Link Activities
When creating activities, you have probably already noticed: all activities start on the project start date, if there are no constraints or links defined in the template you used for the project creation.
Now, it is a matter of implementing the logical dependencies of the activities with links on the time axis. For example, a developer can only start developing an application once the corresponding specification has been completed.
That is, it is a sequential sequence of processes. This is where End-to-beginning relationships come into play.
Choose from different types of links
Planisware Enterprise offers you the option of choosing between different types of links for special scenarios. Here is an overview:
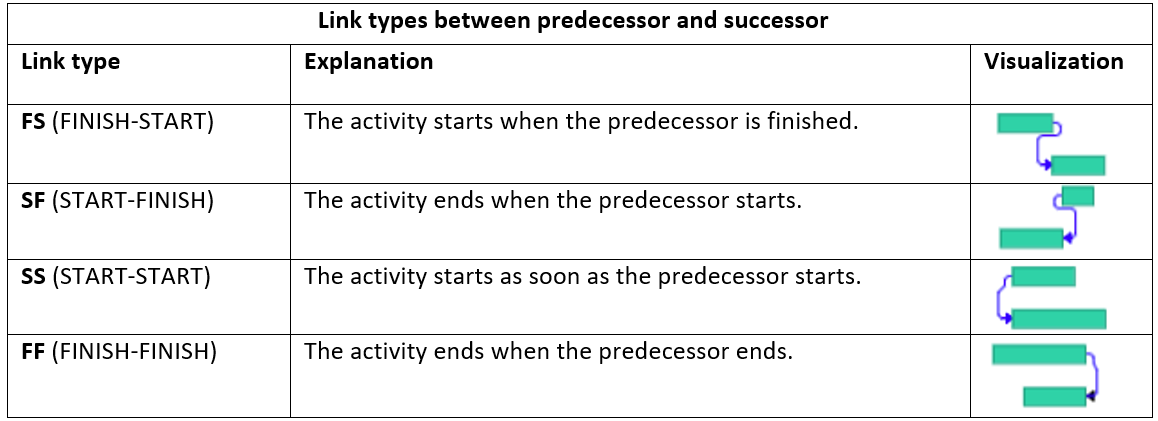
There are several ways to link tasks:
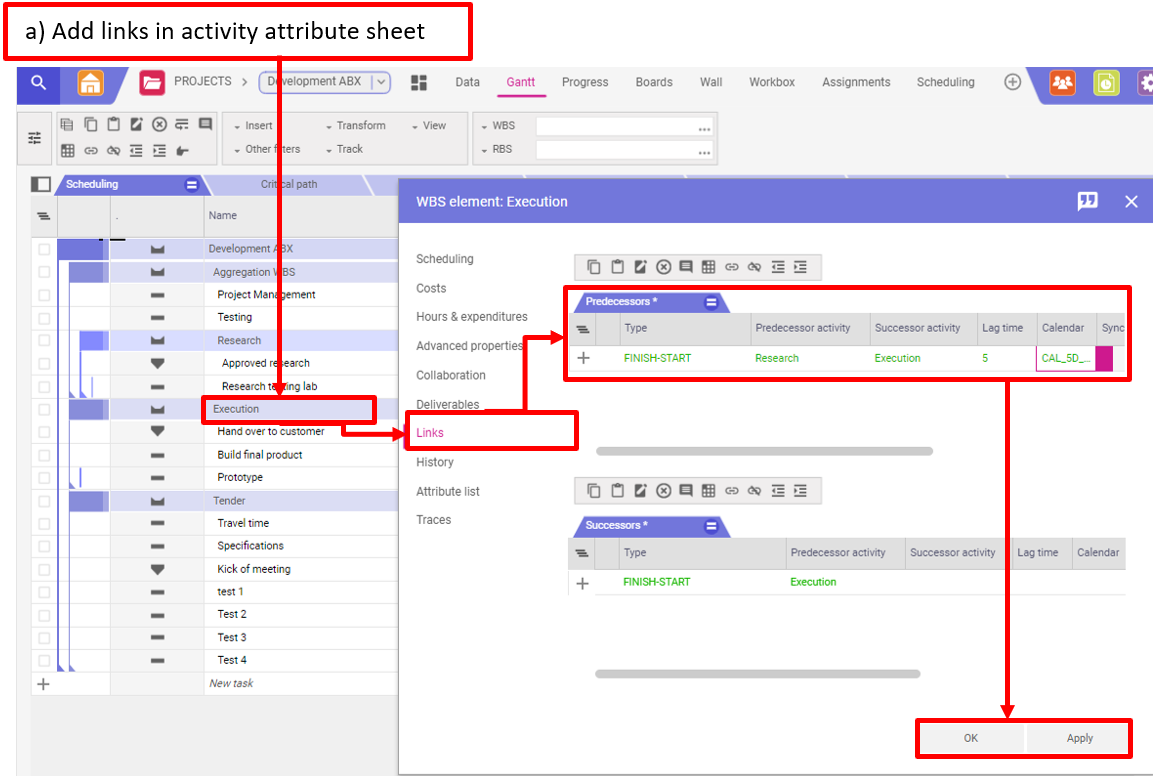
a) Add links in activity attribute sheet
Open the activity attribute sheet by double-clicking on the activity and go to tab Links. Alternatively, you can use CTRL+E to open the attribute sheet or right-click Edit. Choose the Predecessor activities and define the Type. The FINISH-START link type is shown as default value.
In case you add a value for the Lag time, make sure you also fill the Calendar column, if you want non-working days to be taken into consideration for the calculation of the lag time. The lag time is not to be understood as a buffer, but as a fixed distance (e.g., after painting work, a time interval of 2 days must be maintained so that the paint can dry. Before that, no pictures can be hung).
b) Direct table input in Predecessor column
Go to the Gantt page, tab Scheduling, and type in the relationships in the Predecessor column. Enter the row number of the operation to be linked directly in the cell. Other link types than FINISH-START must be entered by abbreviation after the line number of the linked operation (e.g., 4FF = FINISH-FINISH with operation 4).
If you want to define more than one predecessor, use semicolon to separate the values (e.g., 14FS;20FS).
You can also add lag time in the predecessor column (e.g., 14FS+5d;20FS+10d), but be aware that no calendar will be considered for the lag if it is not defined in the links table.

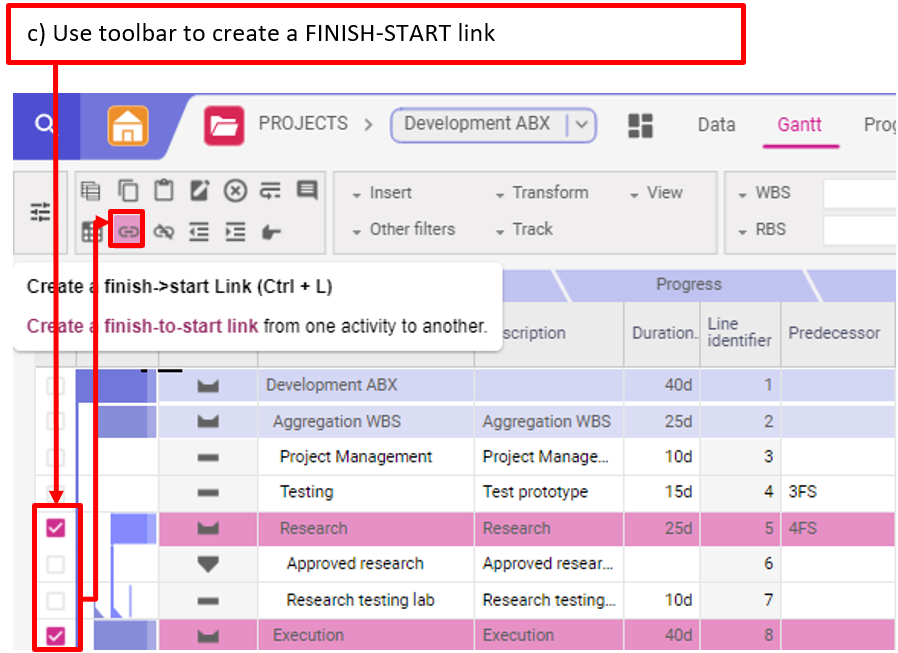
c) Use toolbar to create a FINISH-START link
Go to the Gantt or the Data page and tick the activities you want to link.
Click the Create a finish->start Link symbol or use CTR+L to link the activities.
Please note: The Predecessor will always be the activity that you ticked first.
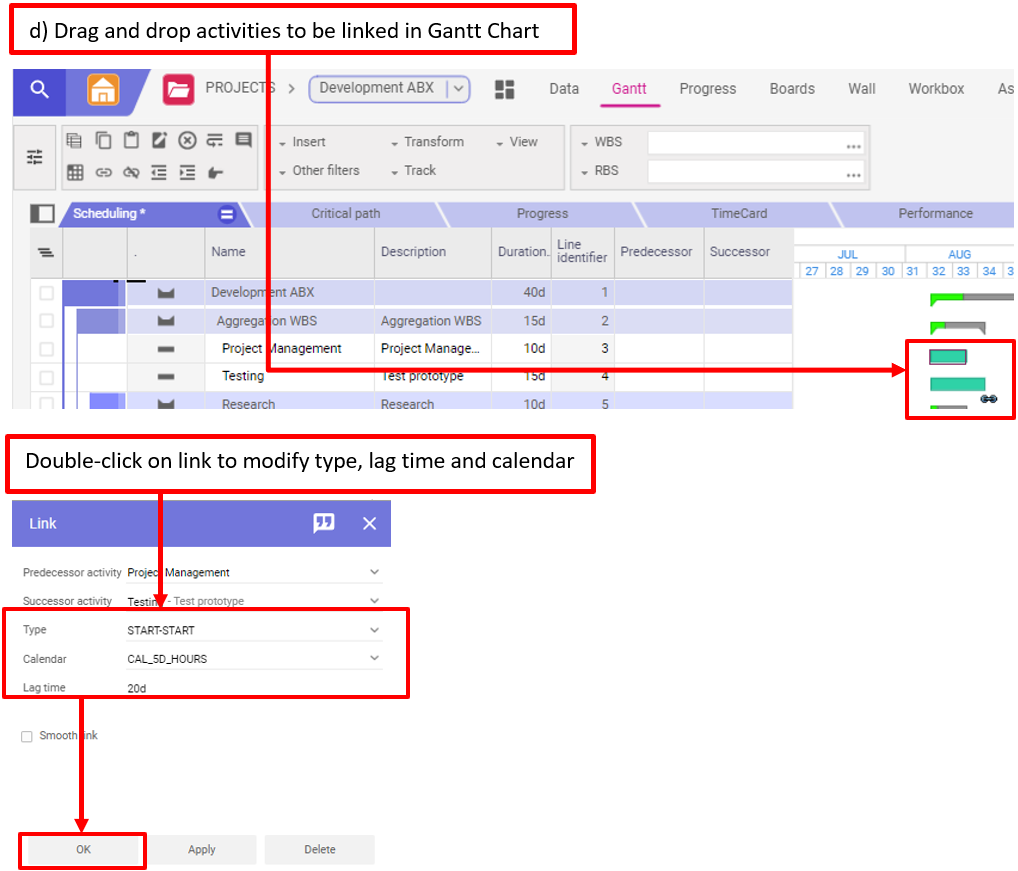
d) Drag and drop activities to be linked in Gantt Chart
You can also create a link by dragging the mouse from one task to another in the Gantt Chart. In this case, a FINISH-START relationship (FS) is automatically created. If you double-click on the link in the Gantt chart, the Link attribute sheet opens. You can change the link type and add lag time and a calendar for the link.
Step 7: Set Constraints or Inactivate Automatic Calculation for some Activities
In most cases, you will use the automatic calculation of Planisware Enterprise based on the project start date, duration of tasks and links. In some cases, you might want to define constraints for the start or finish date of an activity or plan activities with fixed dates.
a) Use Start no earlier than or Finish no later than constraint
To add a Start no earlier than or Finish no later than constraint, double-click on the activity or open the attribute sheet with CTRL+E. Define the constraint date in the field Start no earlier than or Finish no later than and click OK.
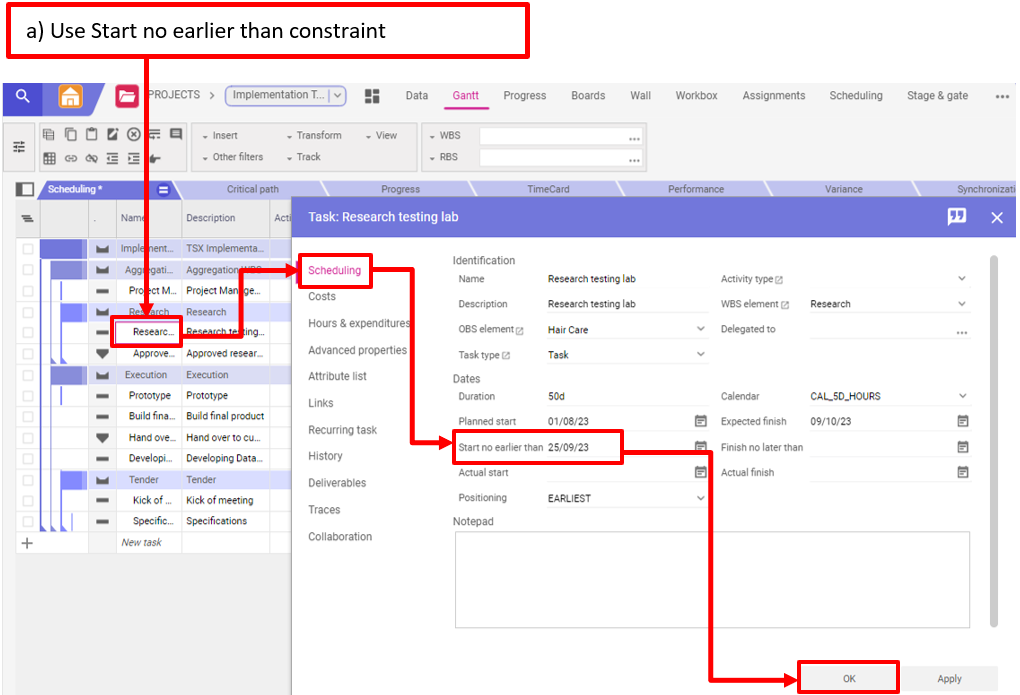
Please note:
By manually changing the Planned start of a WBS element or task, you will automatically create a Start no earlier than constraint for this activity.
Constraints done for a WBS element are automatically considered for the calculation of the Planned start of the activities that belong to the WBS element. This behavior can be inactivated for an activity by ticking the field Do not consolidate dates in the parent WBS element.
b) Inactivate auto population for WBS elements
For the WBS elements, values such as duration, work, start, end, and costs are by default auto populated based on the activities below the WBS element. This behavior can be inactivated by unticking the field Dates consolidation for the WBS element in the Advanced properties of the WBS element attribute sheet.

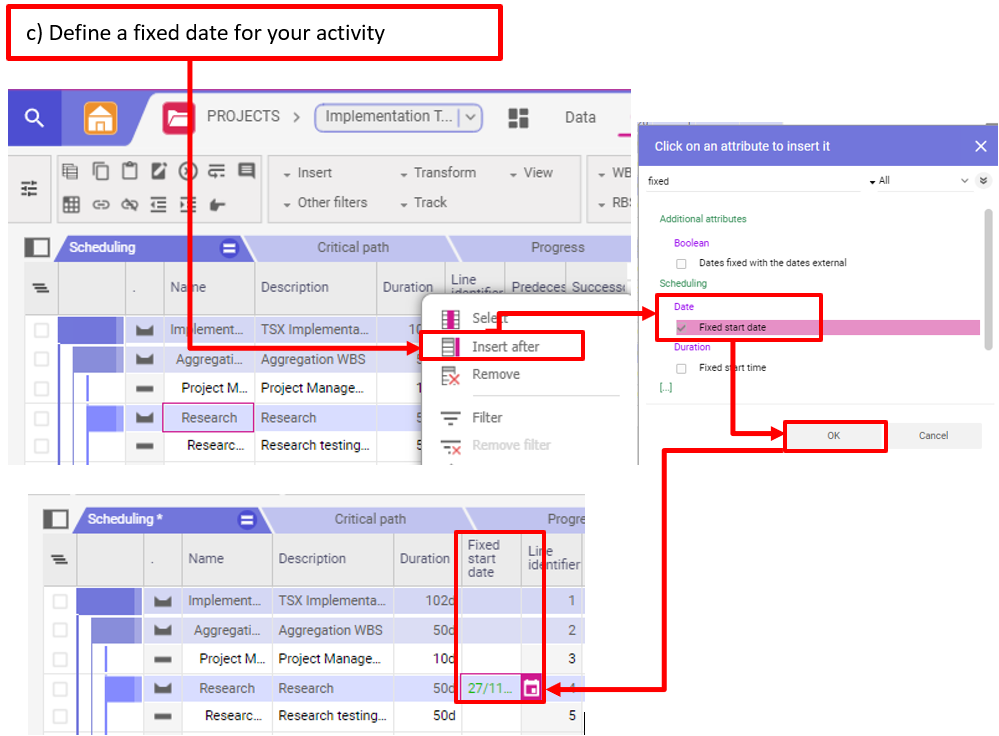
c) Define a fixed date for your activity
If you do not want an activity to be automatically calculated, you can use the field Fixed start date to add a fixed start date by inserting this field to your table view.
Step 8: Plan Resources
In the previous 7 steps, you have defined the schedule of your project. To meet your planned deadlines and keep track of costs and materials, you should now think about the necessary resources and planned hours for your project.
Special Download: Capacity Planning – 4 Important Success Factors (PDF file)
Please fill in the form.
* Required Fields | Data Protection
Generic Resources, Named Resources, Skills, Locations
Planisware Enterprise offers different ways to define what resources you need for your projects. Depending on the resource management process of your company, you have the option to request generic or named resources and to request resources based on skills and / or locations.
Roles can be used as placeholders in your plan or within project templates and offer a combination of requested skills and locations.
At the beginning of project planning, it may not be clear which named resources will be part of your project team. By using generic resources combined with skills and locations, you can request resources from the resource managers that fit your needs instead of planning named resources.
This is how it works: to plan and request resources, you can use the following ways:
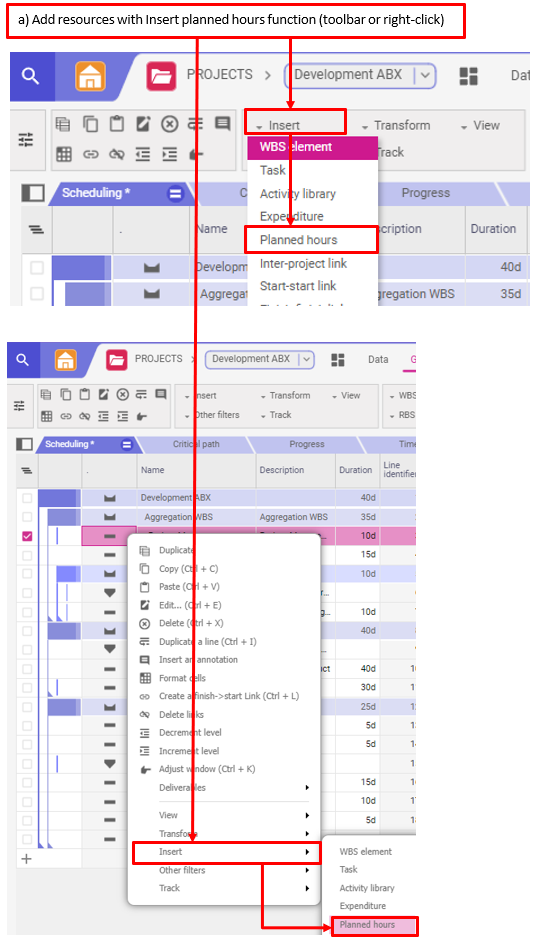
a) Add resources with Insert Planned hours function
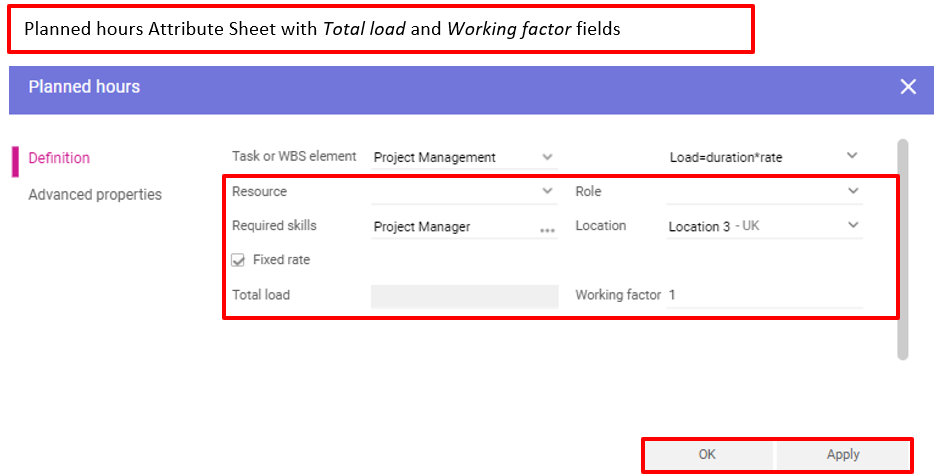
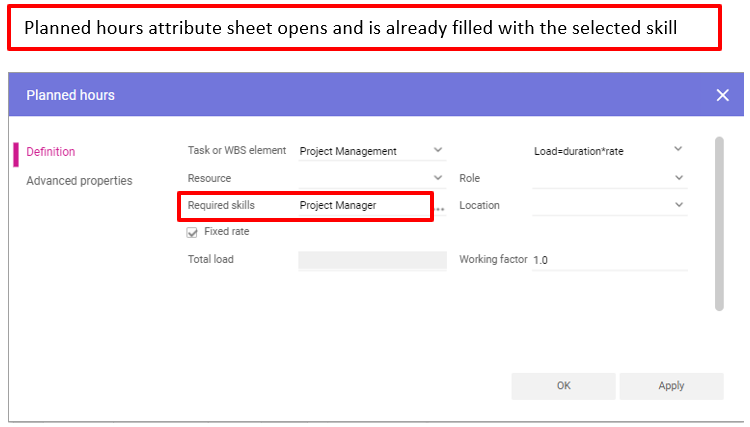
Go to the Gantt page in your project and tick the activity in which you want to plan resources. Click Insert – Planned hours in the tool bar or right-click on the activity and choose Insert – Planned hours to open the Planned hours attribute sheet. Choose a resource or a generic resource from the Resource drop-down menu and / or Required Skill and Location.
You can plan work based on the Working factor (the number is equal to the number of resources you want to plan) or based on Total load by unticking the Fixed rate checkbox. The Total load value equals the number of hours you want to plan for a task.
Click OK.
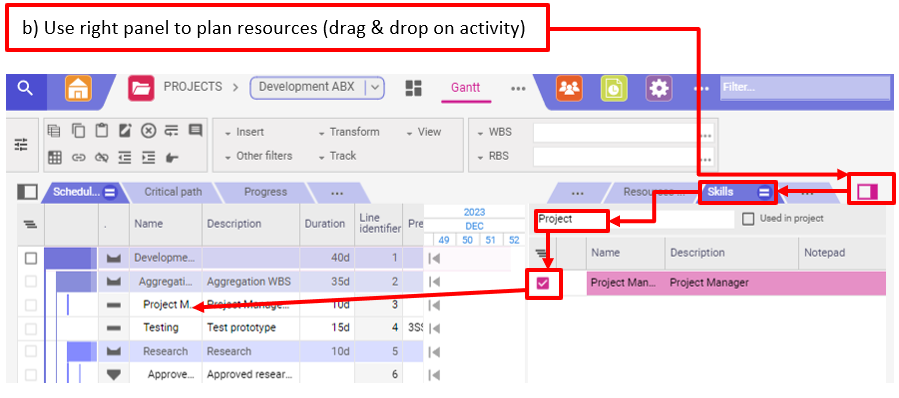
b) Use right panel to plan or request resources
If you have many different resources and skills available within your company, it will be easier to use the right panel to filter for the appropriate resources, skills, and locations. Go to the Gantt page and click on the Display right panel symbol. This will open the following tabs to search: All resources, Resources already assigned or supplied, Skills, Locations.
Filter, e.g., for a skill, and tick the value you want to use for the planned hours. Drag and drop it from the right panel to the activity in which you want to plan the hours. The Planned hours attribute sheet will open to fill more details for your resource requirements. Click OK.
c) Activate Hours type summary lines for your plan
To be able to see the planned hours in the Gantt chart and the table view, the checkbox Hours type summary lines needs to be activated in Toolbar – View or right-click – View.
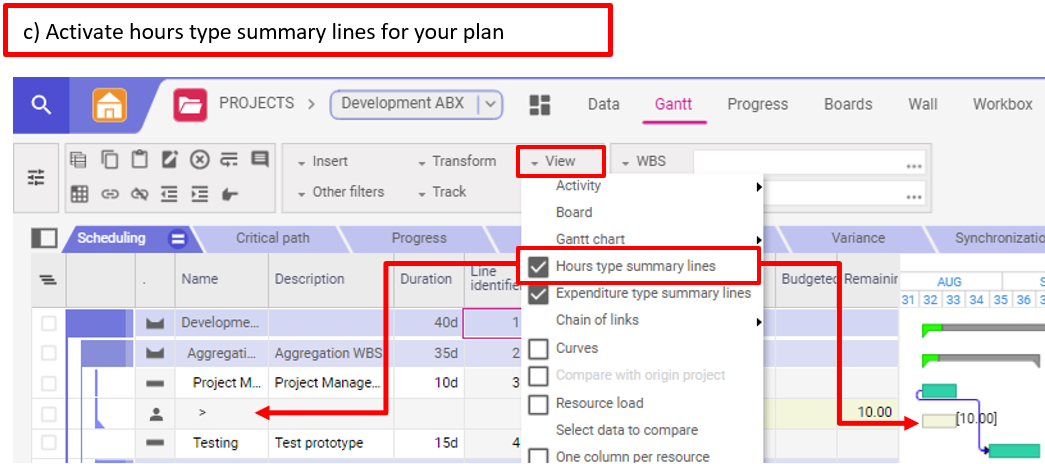
If an hourly rate is maintained for the planned resource (generic or named resource), the labor costs forecast will automatically be calculated based on the planned hours.
Reading tip: Project Resource Management – Basics and Areas
Step 9: Plan Expenditures
In the previous step, you defined the planned hours for your project. To keep track of costs and materials, you should now think about the necessary planned expenditures for your project.
When you create an expenditure, you have the possibility to select the expenditure type, e.g., Commitment, Income, or Cost impact. If you use the Standard expenditure type, it means costs to pay.
Different meta data can be used by your company to catch the consolidated data, e.g., Cost account. Some other meta data will help you to schedule the cost: Lag time, Phase, Start date, End date and Duration computation. All those settings will be managed by your company, and you will just have to follow the process.
This is how it works:
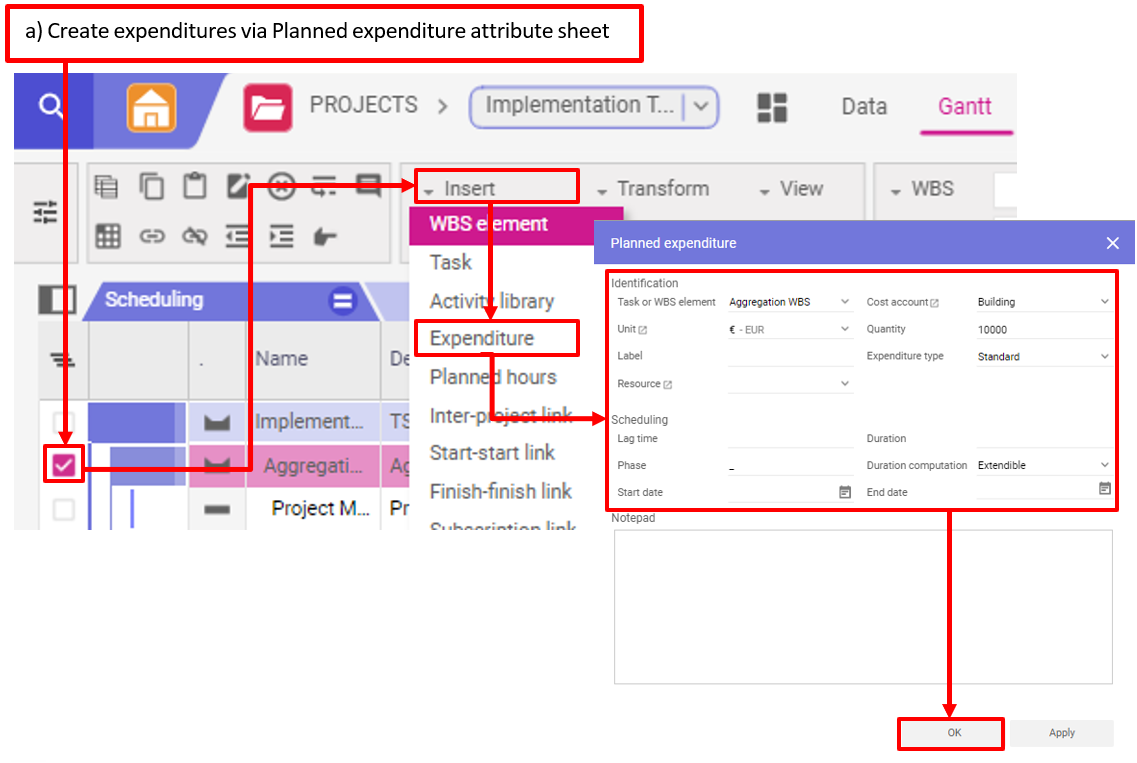
a) Use the Planned expenditure attribute sheet
- Go to your project and open the Gantt chart.
- Select the corresponding activity in which you want to plan the expenditure.
- Select Insert – Expenditure in the tool bar to open the Planned expenditure attribute sheet.
- The Task or WBS element field is already filled with the name of the selected activity.
- You can fill in the fields Cost account, Unit and Quantity and add a Label.
- Depending on the configuration of your Planisware environment, you can assign the expenditure to a corresponding Resource.
- Select Duration computation
- If Extendible is your choice, it means that the quantity will be calculated through the activity’s duration.
Example: duration = 5 days, quantity = 1000 EUR, i.e., you plan to pay 200 EUR every day. - If Lag during is selected at the creation, the expenditure will be planned at the start date of the activity. You can use the Start date and End date of the planned expenditure to adapt the payment date.
- If you choose Fixed dates, you must define the Start date and End date corresponding to the payment date. Sometimes, a payment can be made before or after the activity but is still linked to this activity.
- If you choose At the end of activity, the planned expenditure will be placed at the end of the activity.
- If Extendible is your choice, it means that the quantity will be calculated through the activity’s duration.
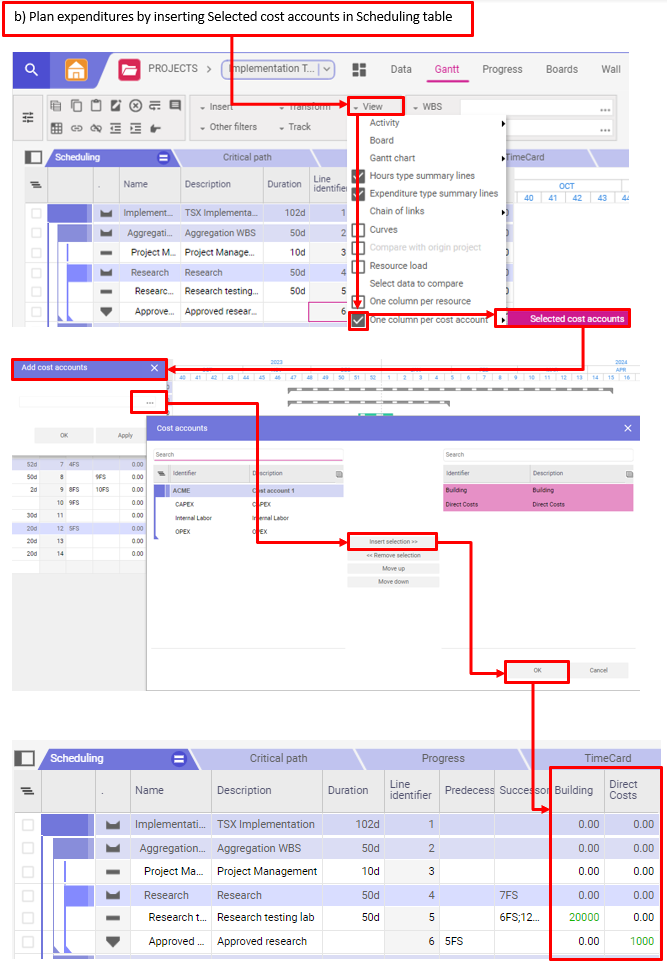
b) Plan expenditures by inserting Selected cost accounts in Scheduling table
- Go to your project, open the Gantt page
- In the toolbar, go to View – One column per cost account – Selected cost accounts and select the cost accounts you want to plan expenditures for. The selected cost accounts will be added as columns to your table view.
- Enter your values and save them.
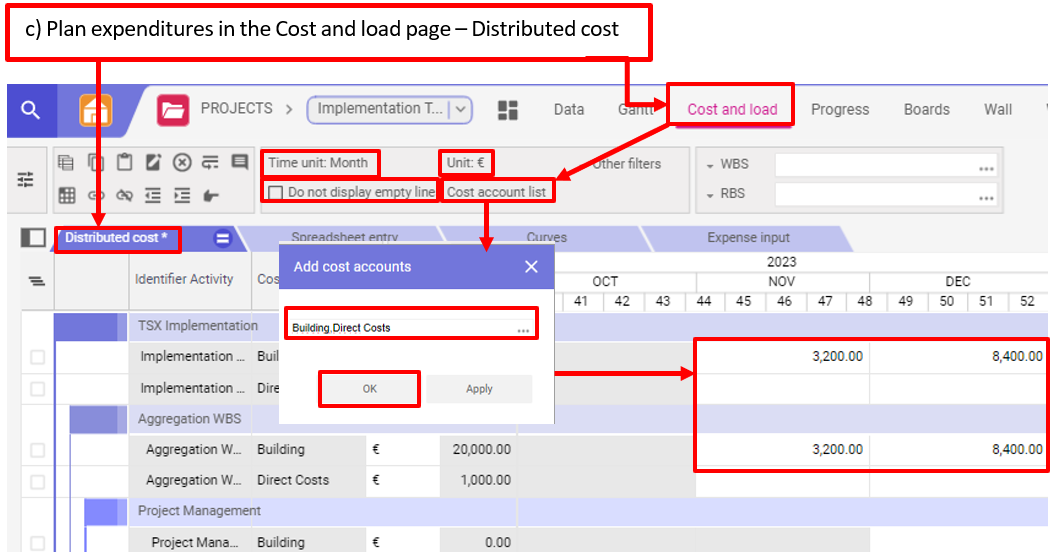
c) Plan expenditures in the Cost and load page – Distributed cost
- Go to your project, open the Cost and load page, style Distributed cost.
- In the toolbar, untick Do not display empty lines, choose the corresponding Time unit and Unit. Click Cost account list and select the cost accounts in which you want to plan expenditures.
- Add the planned expenditures per time unit for the selected cost accounts and save them.
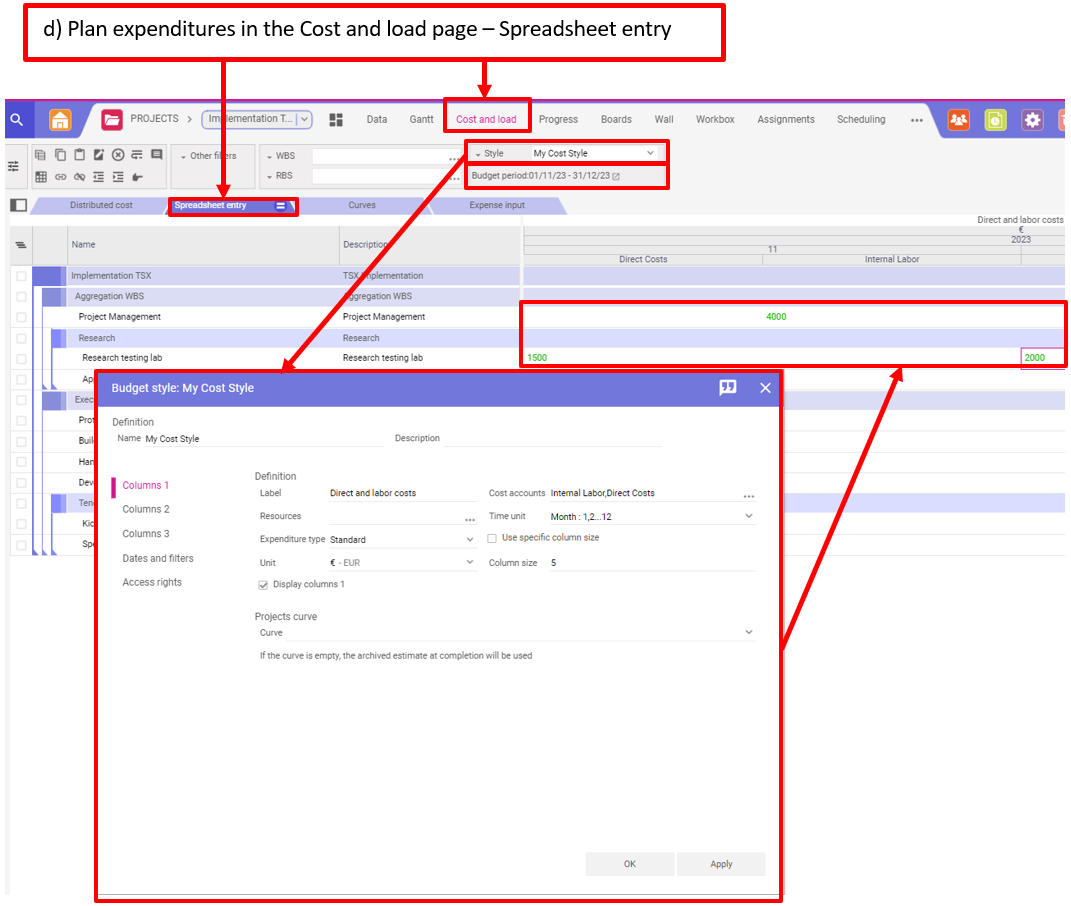
d) Plan expenditures in the Cost and load page – Spreadsheet entry
- Go to your project, open the Cost and load page and choose the style Spreadsheet entry.
- Select the corresponding Style in the toolbar or create a new style and define the Budget period.
- Then, insert the corresponding quantity for the Time unit and the Cost accounts that are defined in the style and save them.
Step 10: Data Consolidation at Project and WBS Level
To keep an eye on the overall project and at WBS level, Planisware automatically consolidates costs, duration and dates for a project or WBS element based on the values from the activities below the element.
To view the information on project or WBS level, you can create a style with at least the following elements in the Gantt or Data page of your project:
- Name
- Planned start
- Planned finish
- Duration
- Budget at completion (BAC)
- Additional cost or date information, e.g., Actual cost (ACWP), Actual start
This is how it works:
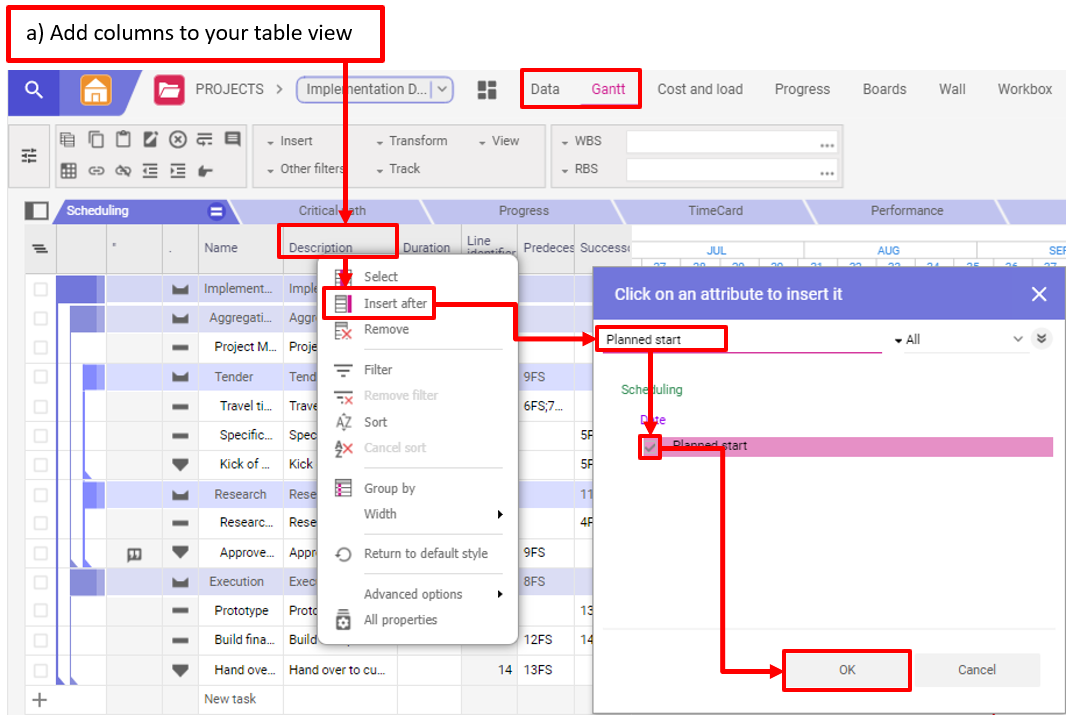
a) Add columns to your table view
- Open a project in the PROJECTS module and go to the Gantt or Data page.
- Right-click into a column of the table view, select Insert after and search for the columns you want to use for the consolidation.
- Tick the requested fields and click OK.
b) Create your own style
- Click on the Style manager symbol
- Add a style name and click the + symbol. The new style is now shown in the table view.
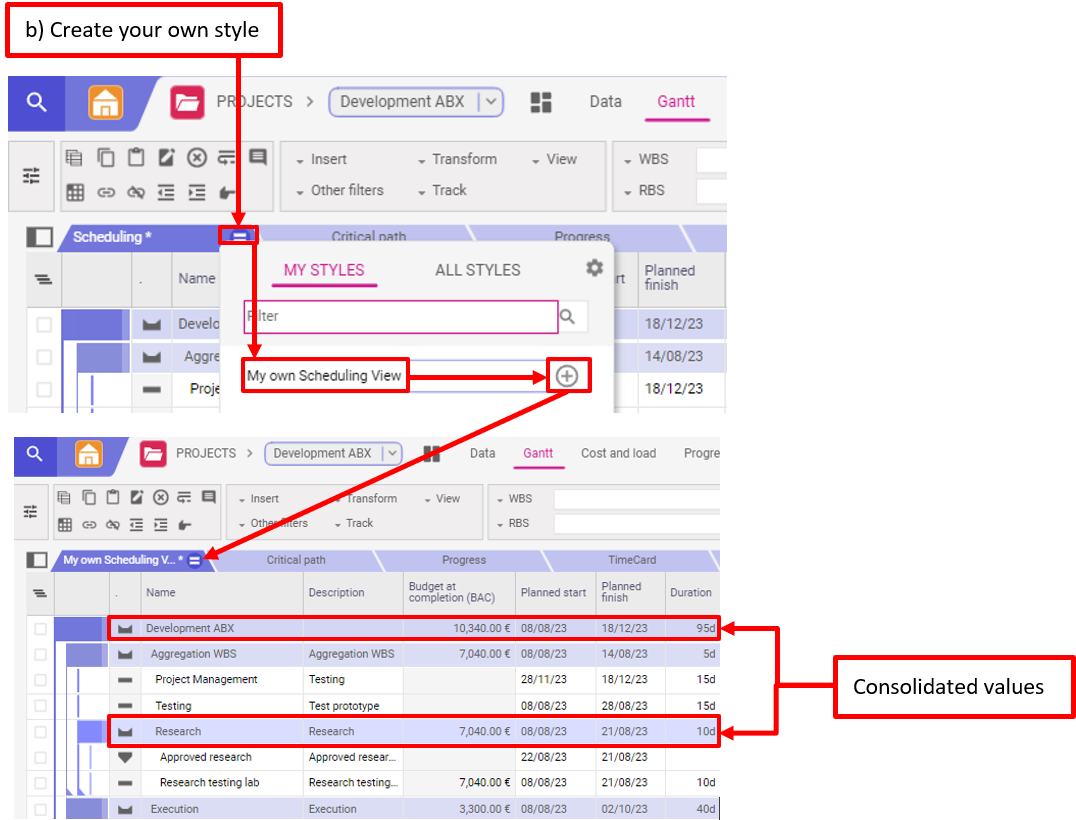
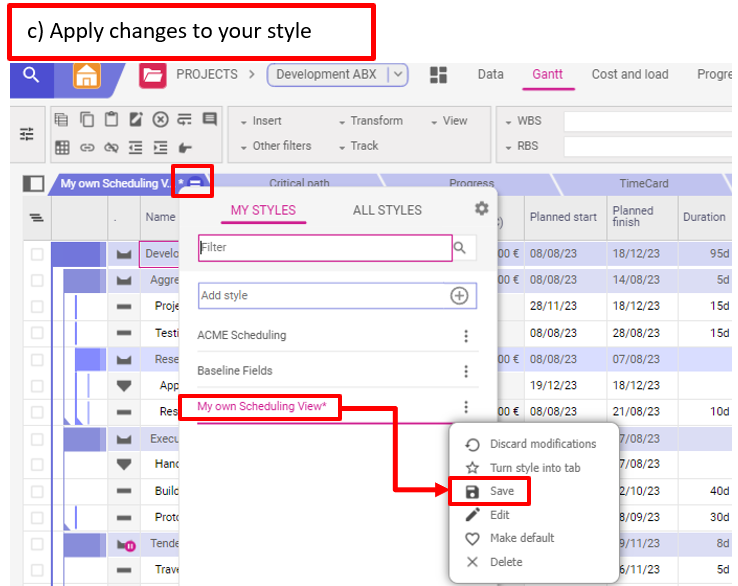
c) Apply changes to your style
You can update your style by adding further columns or removing columns. Until you save your changes an asterisk (*) will appear at the end of the style label. To save the changes, click on the Style manager symbol and on the three dots next to your style. Click Save.
Step 11: Save Baseline
With the previous steps, you have a complete project plan. However, before you start with the implementation, you should save the initial planning status as a baseline. Because if we are honest, very few projects go 100% according to plan – and you would certainly like to be able to draw a comparison between target and actual during the project or at the end.
Depending on the defined processes within your company, the responsibility for saving the baseline can vary. For instance, some companies use an automated process combined with the Stage & Gate process or limit the permissions for saving baselines to the Project Management Office. In this case you might not have access to the function to save the baseline in your Planisware environment.
The number of available baselines and the names of the baselines are configured by your administrator.
Approved Baseline
To track the deviation from budget and time during the life of the project, the following fields are filled by saving an approved baseline:
- Start date budget (= current Planned start of your project tasks and milestones)
- End date budget (= current Planned finish of your project, tasks and milestones)
- Budget at completion (BAC) (= current Estimate at completion (EAC))
Those fields will help you to later compare the following deviations:
- Deviation from budget: Budget at completion vs Estimate at completion
- Deviation from time: Start date budget vs Planned start and End date budget vs Planned finish
Only one approved baseline can be set up at the project level. It will include each activity and all the costs based on the current values of planned and actual hours and expenditure including cost calculation.
You need to see the baseline as a reminder of what you have originally planned, and it will help you for analysis.
This is how it works:
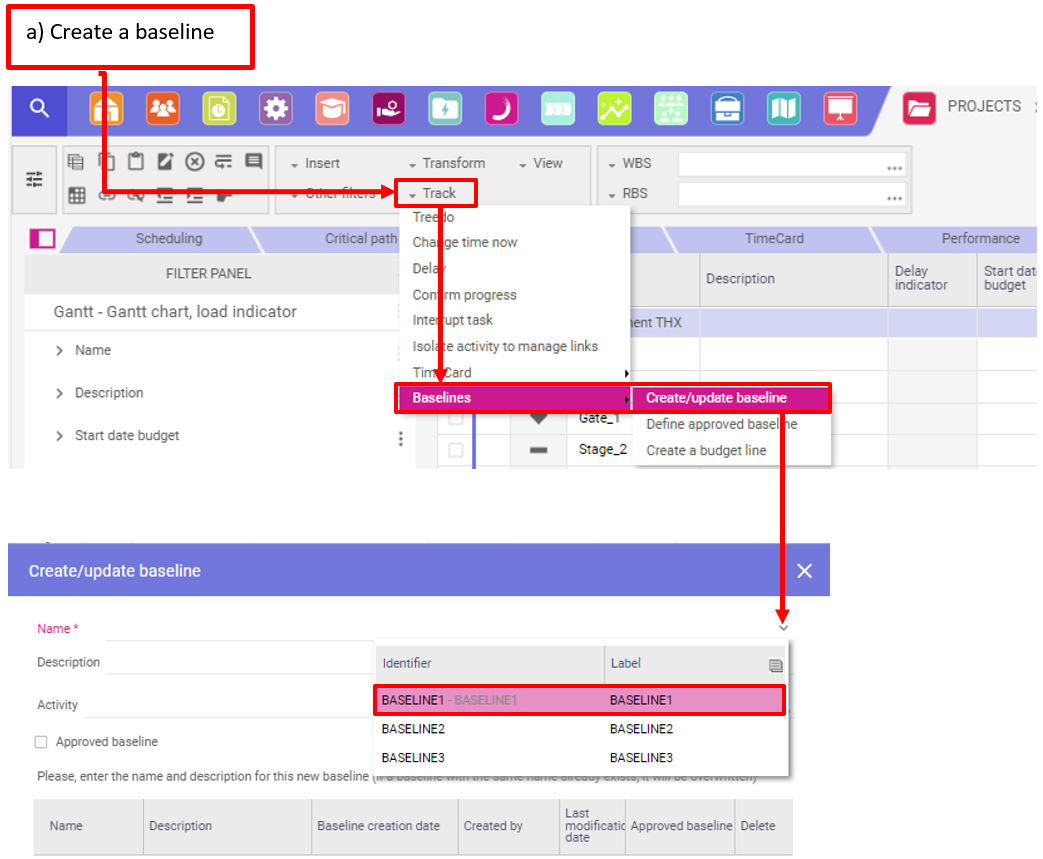
a) Create a baseline
- Open a project in the PROJECTS module and go to the Gantt or Data page.
- Click on Track – Baselines – Create/update baseline to open the Create/update baseline spreadsheet.
- Choose the name of the baseline you need to save based on the processes defined by your company and add a description.
- Click OK.
- It is also possible to save only certain activities by clicking on the three dots in the Activity line in the spreadsheet.
b) Define approved baseline
- You can define an approved baseline directly during the track baseline process by ticking the checkbox Approved baseline in the Create/update baseline spreadsheet.
- You can also click Track – Baselines – Define approved baseline in case you already saved the baseline but did not mark it as an approved baseline.

c) View baseline in Gantt
- Go to the Gantt page and click View – Select data to compare to open the spreadsheet Gantt compared data.
- Click on the three dots to select the baseline you want to choose for the comparison, mark the baseline on the left side and click Insert selection. Click OK.
- You can now choose in what color the baseline values should be shown in the Gantt chart in the Gantt compared data spreadsheet. Click OK.

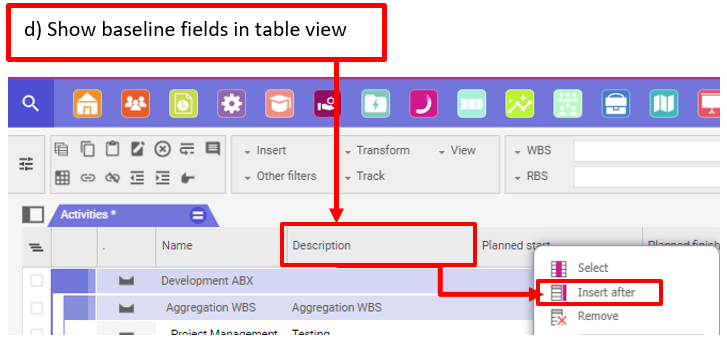
d) Show baseline fields in table view
- Go to a table view in Gantt or Data page and right-click on a column to insert additional attributes as described in Step 10.
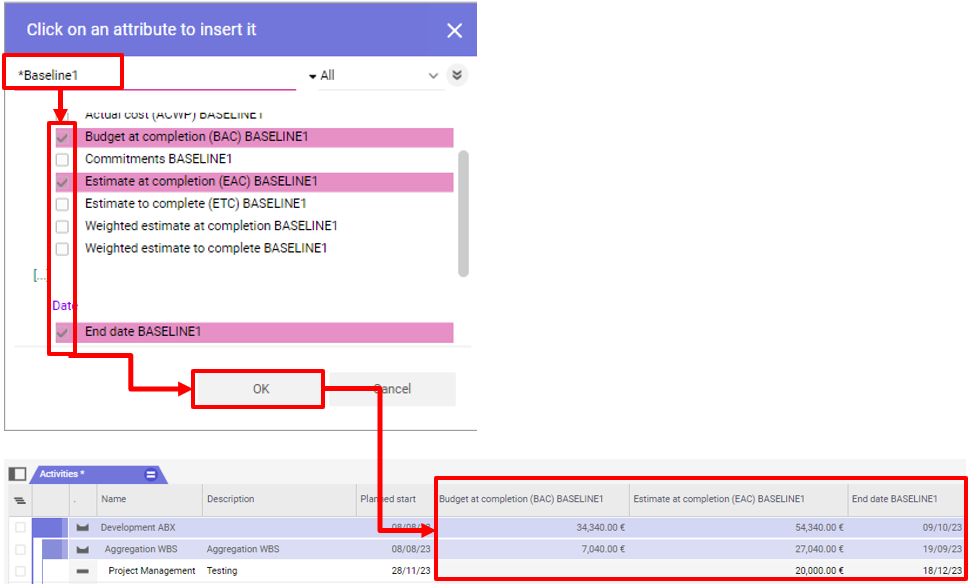
- Search for the fields that contain the name of the baseline, e.g., *Baseline1. Tick the fields you want to insert into your table view and click OK. The columns are now shown in your table view. To create your own style based on the selected columns, see step 10, Create your own style.
Conclusion – Planisware Enterprise Tutorial 11 Steps to the Optimal Project Plan
In this Planisware Enterprise tutorial, you have learned how to create a well-structured project plan in 11 steps.
You now know the correct sequence when setting up a project and know how to:
a) Set a project start date.
b) Create, schedule and structure processes and milestones and link activities.
c) Treat fixed appointments and set constraints.
d) Plan resources and costs.
e) View consolidated values on project and WBS level.
f) Save baselines to monitor success.
The practical tips in this Planisware Enterprise tutorial have explained what you should pay attention to and what to avoid.
Our final tips:
Get to know the individually adaptable “PPM Paradise” – the optimal environment for your enterprise-wide project, program, portfolio and resource management (PPM). Download the free eBook “The PPM Paradise” now (just click, no form).
And sign up for our bi-weekly blog newsletter with information on more hands-on articles, eBooks, etc. to improve your project management maturity level.
Do you still have questions regarding this Planisware Enterprise Tutorial? Please do not hesitate to leave a comment below the post!
Subscribe to TPG BlogInfo: Never miss new practice-oriented tips & tricks
Every other week: Receive practical tips in TPG blog posts written by recognized experts in project, portfolio, and resource management.
* Required Fields | Data Protection
The authors:
Esther Neumann, PMP®, PSM I, Planisware Expert
Solution Architect for PPM Systems with focus on Planisware
Esther Neumann has many years of experience in project management, training, customer support and consulting. She is working as a solution architect and senior consultant for project and portfolio management with a focus on Planisware Enterprise.Read more about Esther Neumann on LinkedIn.
Cyprien Lepine, Planisware Expert
PPM Consultant
Cyprien Lepine has years of experience in project management consulting. In his position as a PPM consultant with a focus on Planisware Enterprise, he helps companies to design, set, train and support their projects from a strategic to operational dimension. His goal is to provide realistic project management advice to help executives make the right decisions. He strives to make people, processes and tools work in harmony and full synchronization.Read more about Cyprien Lepine on LinkedIn.
Martin Gösse, PMP®, PSM I, Planisware Associate
Senior PPM Consultant
Martin Gösse has more than 20 years of experience in training which he has gained in well-known large companies. Besides his training activity, Martin Gösse works as a senior PPM consultant for Microsoft and Planisware project & portfolio management solutions. His practical experience as a project manager, consultant and trainer as well as his knowledge of many industries are the foundation of his training sessions.Read more about Martin Gösse on Xing.


")
2 Comments
This is a great step by step guide to creating a project SCHEDULE. Not a project plan.
Dear Melissa,
Thank you for your feedback on our Planisware Enterprise Tutorial – 11 Steps to the Optimal Project Plan.
You rightly noted that the term plan is generally always vague and that its use and meaning are ultimately ambiguous.
It’s not for nothing that PMI speaks of the “Project Management Plan” as “…the document that describe how the project will be executed, monitored and controlled, and closed. It integrates and consolidates all of the subsidiary management plans and baselines …” ( PMBOK Guide, Sixth Edition, p.86).
We didn’t use “Schedule” because the tutorial with its 11 steps describes more (resource planning, cost planning, baseline) than the creation of the schedule.
Best regards
Martin